

Growing Sweet Corn at Home might seem like a challenge reserved for sprawling farms, but I’m here to tell you it’s absolutely achievable, even in a small backyard or raised garden bed! Imagine biting into a juicy, sun-ripened ear of sweet corn that you nurtured from seed to table. That’s the magic we’re unlocking today.
For centuries, corn has been a staple crop, deeply woven into the fabric of countless cultures. From the ancient civilizations of Mesoamerica, where corn was revered as a sacred gift, to its modern-day presence in cuisines around the globe, this versatile grain has nourished and sustained communities. Now, you can participate in this rich history by cultivating your own little piece of corn paradise.
Why bother with the effort of growing sweet corn at home when you can simply buy it at the store? Well, for starters, the flavor of homegrown corn is simply unparalleled. The sugars in corn begin to convert to starch the moment it’s picked, so the freshest, sweetest corn is always the corn you harvest yourself. Plus, you’ll know exactly what went into growing it – no mystery pesticides or questionable farming practices. In this article, I’ll share some simple, effective DIY tricks and hacks that will make growing sweet corn at home a breeze, even if you’re a complete beginner. Get ready to enjoy the sweet taste of success!

Growing Sweet Corn: From Seed to Table, My Backyard Adventure!
Hey there, fellow garden enthusiasts! I’m so excited to share my experience growing sweet corn right in my backyard. It’s surprisingly easier than you might think, and the taste of homegrown corn is simply unbeatable. Get ready to ditch the grocery store cobs and enjoy the sweet reward of your own hard work!
Choosing the Right Sweet Corn Variety
Before we even think about planting, let’s talk about choosing the right sweet corn variety. This is crucial for success!
* Consider your climate: Some varieties are better suited for cooler climates, while others thrive in warmer regions. Check your local planting guides or ask at your local nursery for recommendations.
* Days to maturity: This is the number of days from planting to harvest. Choose a variety that fits your growing season. I usually go for something in the 70-80 day range.
* Kernel color: Sweet corn comes in yellow, white, and bi-color (yellow and white) varieties. It’s all a matter of personal preference! I’m a big fan of bi-color corn.
* Disease resistance: Look for varieties that are resistant to common corn diseases in your area. This can save you a lot of headaches down the road.
* Sugar enhanced (se) or supersweet (sh2): These varieties have higher sugar content and stay sweet longer after harvest. They are my go-to choices!
Some popular and reliable varieties include ‘Silver Queen’ (white), ‘Golden Bantam’ (yellow, heirloom), ‘Honey Select’ (tri-sweet), and ‘Miracle’ (bi-color). Do some research and pick what sounds best for you!
Preparing the Soil: The Foundation for Success
Corn is a heavy feeder, meaning it needs a lot of nutrients to grow well. So, soil preparation is key!
* Sunlight: Sweet corn needs at least 6-8 hours of direct sunlight per day. Choose a location in your yard that gets plenty of sun.
* Soil type: Corn prefers well-drained, fertile soil. If your soil is heavy clay or sandy, you’ll need to amend it.
* Soil testing: A soil test can tell you the pH and nutrient levels of your soil. This will help you determine what amendments you need to add. Your local extension office can provide information on soil testing.
* Amendments: I usually add plenty of compost and well-rotted manure to my soil before planting. This provides essential nutrients and improves drainage. You can also add a balanced fertilizer, following the package instructions.
* Tilling or digging: Loosen the soil to a depth of at least 12 inches. This will allow the corn roots to grow easily. I use a tiller, but you can also do it by hand with a shovel or garden fork.
Planting Sweet Corn: Getting Started
Now for the fun part – planting!
* Timing: Sweet corn is a warm-season crop and should be planted after the last frost. The soil temperature should be at least 60°F (16°C). I usually wait until the soil has warmed up to around 65°F (18°C) to be safe.
* Planting method: Corn is wind-pollinated, so it’s important to plant it in blocks rather than long rows. This will ensure good pollination.
* Spacing: Plant seeds 1-2 inches deep and 6-12 inches apart in rows that are 2-3 feet apart.
* Watering: Water the seeds well after planting. Keep the soil moist but not soggy until the seedlings emerge.
* Succession planting: To extend your harvest, plant a new batch of corn every 2-3 weeks. This will give you a continuous supply of fresh corn throughout the season.
Step-by-Step Planting Instructions:
1. Prepare the soil: Follow the steps outlined in the “Preparing the Soil” section.
2. Create rows: Use a hoe or rake to create rows that are 2-3 feet apart.
3. Plant the seeds: Plant seeds 1-2 inches deep and 6-12 inches apart in the rows.
4. Cover the seeds: Gently cover the seeds with soil.
5. Water thoroughly: Water the soil well after planting.
6. Mark the rows: Use stakes or row markers to identify the rows.
Caring for Your Sweet Corn: Nurturing Your Crop
Once your corn is planted, it’s important to provide it with the care it needs to thrive.
* Watering: Corn needs consistent moisture, especially during tasseling and silking (when the tassels and silks appear). Water deeply and regularly, especially during dry periods. I aim for about 1 inch of water per week.
* Fertilizing: Corn is a heavy feeder, so you’ll need to fertilize it regularly. I usually side-dress my corn with a nitrogen-rich fertilizer when it’s about 1 foot tall and again when the tassels appear. Follow the package instructions for application rates.
* Weeding: Keep the area around your corn plants free of weeds. Weeds compete with corn for nutrients and water. Hand-pull weeds or use a hoe to cultivate the soil. Be careful not to damage the corn roots.
* Pest control: Corn is susceptible to several pests, including corn earworms, European corn borers, and aphids. Inspect your plants regularly for signs of pests. You can use organic pest control methods, such as insecticidal soap or Bacillus thuringiensis (Bt), to control pests.
* Supporting the stalks: If your corn stalks are tall and prone to falling over, you may need to provide support. You can use stakes or tie the stalks together to prevent them from lodging.
Pollination: Ensuring a Full Harvest
As I mentioned earlier, corn is wind-pollinated. This means that the pollen from the tassels (the male flowers at the top of the plant) needs to land on the silks (the female flowers that emerge from the developing ears) in order for the kernels to develop.
* Encourage pollination: To ensure good pollination, you can gently shake the corn stalks when the tassels are shedding pollen. This will help to distribute the pollen more evenly.
* Hand-pollination (if needed): If you’re growing corn in a small space or if the weather is not conducive to pollination (e.g., no wind), you can hand-pollinate the corn. To do this, collect pollen from the tassels in a paper bag and then gently sprinkle it onto the silks.
Harvesting Sweet Corn: The Sweet Reward
Harvesting sweet corn at the right time is crucial for getting the best flavor.
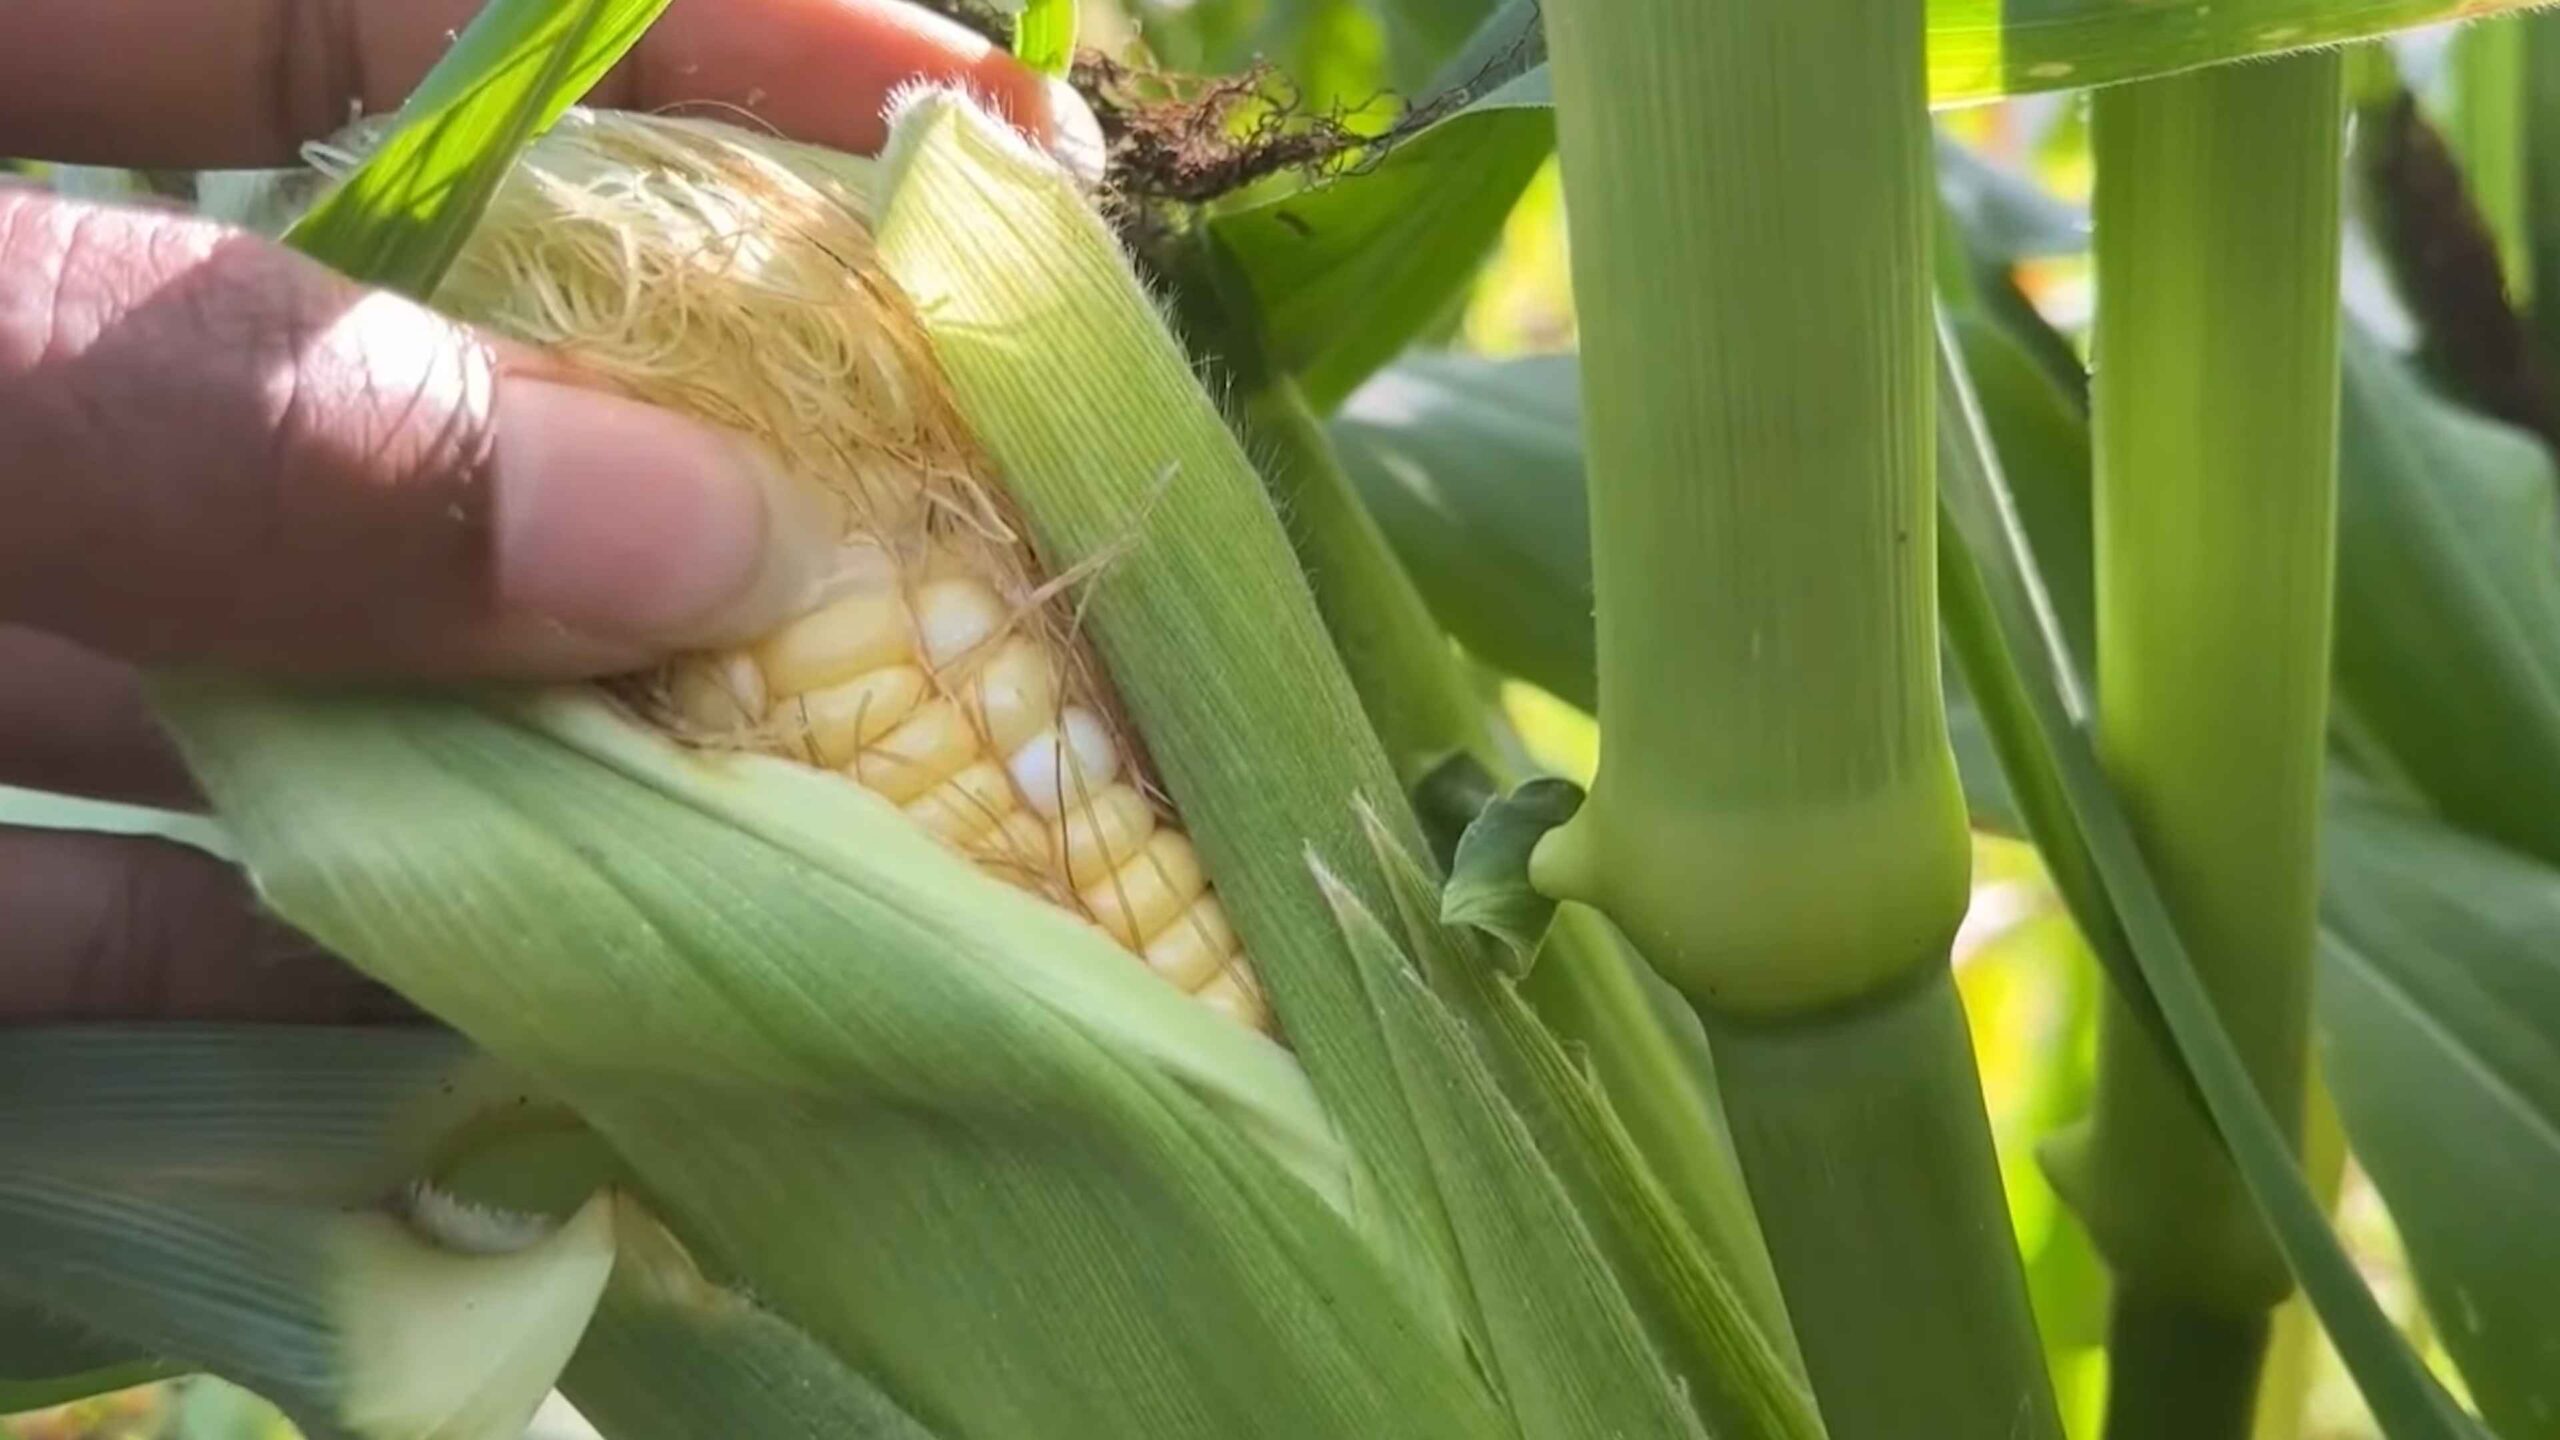
* Timing: Sweet corn is usually ready to harvest about 3 weeks after the silks appear. The silks will turn brown and dry, and the ears will feel plump and full.
* Testing for ripeness: To test for ripeness, peel back a portion of the husk and puncture a kernel with your fingernail. If the liquid that comes out is milky, the corn is ready to harvest. If the liquid is clear, the corn is not ripe yet. If the liquid is doughy, the corn is overripe.
* Harvesting: To harvest sweet corn, grasp the ear firmly and twist it downward. The ear should snap off easily from the stalk.
* Enjoying your harvest: Sweet corn is best eaten fresh, but it can also be frozen or canned for later use. I love grilling it, boiling it, or roasting it in the oven.
Step-by-Step Harvesting Instructions:
1. Check for ripeness: Look for brown, dry silks and plump ears.
2. Test a kernel: Peel back a portion of the husk and puncture a kernel with your fingernail. Look for milky liquid.
3. Harvest the ear: Grasp the ear firmly and twist it downward to snap it off the stalk.
4. Enjoy immediately: Sweet corn is best eaten fresh!
Troubleshooting: Common Problems and Solutions
Even with the best planning, you might encounter some problems while growing sweet corn. Here are a few common issues and how to address them:
* Poor germination: If your seeds don’t germinate, it could be due to cold soil, poor-quality seeds, or overwatering. Make sure the soil is warm enough before planting, use fresh seeds, and avoid overwatering.
* Stunted growth: Stunted growth can be caused by nutrient deficiencies, pests, or diseases. Make sure your soil is fertile and free of pests and diseases. Fertilize regularly with a balanced fertilizer.
* Poor pollination: Poor pollination can result in ears with missing kernels. Encourage pollination by shaking the stalks or hand-pollinating.
* Corn earworms: Corn earworms are common pests that can damage the ears of corn. Use organic pest control methods, such as Bacillus
Conclusion
So, there you have it! Growing sweet corn at home isn’t just a gardening project; it’s an investment in flavor, freshness, and a deeper connection to your food. We’ve walked through the steps, from selecting the right variety to troubleshooting common issues, and hopefully, you’re feeling confident and ready to get your hands dirty.
Why is this DIY trick a must-try? Because the taste of homegrown sweet corn, picked at its peak ripeness and cooked within minutes, is simply unparalleled. Store-bought corn, even the freshest-looking ears, can’t compete with the sweetness and tenderness that comes from nurturing your own crop. Beyond the superior taste, growing your own sweet corn is a rewarding experience. It’s a chance to learn about the natural world, to connect with the seasons, and to enjoy the satisfaction of harvesting something you’ve grown yourself. Plus, it’s a fantastic way to reduce your carbon footprint and support sustainable food practices.
But the benefits don’t stop there. Growing sweet corn at home allows you to control exactly what goes into your food. You can choose to use organic methods, avoiding harmful pesticides and herbicides, ensuring that your family is eating the healthiest, most natural corn possible.
Ready to take your sweet corn game to the next level? Consider these variations and suggestions:
* Succession Planting: Plant a new batch of sweet corn every two weeks to extend your harvest season. This way, you’ll have a continuous supply of fresh corn throughout the summer.
* Companion Planting: Sweet corn thrives when planted alongside beans, squash, and cucumbers. This “Three Sisters” method is a traditional Native American technique that provides mutual benefits to all three plants. The beans fix nitrogen in the soil, the squash provides ground cover to suppress weeds, and the corn provides a support for the beans to climb.
* Experiment with Varieties: Don’t be afraid to try different varieties of sweet corn. There are countless options available, each with its own unique flavor and characteristics. Some popular choices include ‘Honey Select,’ ‘Silver Queen,’ and ‘Peaches and Cream.’
* Grilled Corn on the Cob: For a smoky and delicious treat, grill your homegrown sweet corn on the cob. Simply soak the ears in water for 30 minutes, then grill them over medium heat until the kernels are tender and slightly charred.
* Creamed Corn: Transform your harvest into a creamy and comforting side dish. Freshly made creamed corn is a world apart from the canned version.
* Corn Chowder: Use your sweet corn as the star ingredient in a hearty and flavorful corn chowder. Add potatoes, bacon, and cream for a truly satisfying meal.
Growing sweet corn at home is an adventure, and we encourage you to embrace it! Don’t be afraid to experiment, to learn from your mistakes, and to enjoy the process. The rewards are well worth the effort.
So, grab your seeds, prepare your garden, and get ready to experience the joy of homegrown sweet corn. We can’t wait to hear about your experiences! Share your photos, tips, and stories with us in the comments below. Let’s build a community of sweet corn enthusiasts and inspire others to grow their own food. Happy gardening!
Frequently Asked Questions (FAQ)
How much space do I really need to grow sweet corn?
Sweet corn needs space to thrive, but you don’t necessarily need acres of land. A patch of at least 4 feet by 4 feet is a good starting point. Remember, sweet corn is wind-pollinated, so planting in blocks rather than long rows will improve pollination rates. The more plants you have close together, the better the chances of successful pollination and full ears of corn. If you’re limited on space, consider a raised bed or container gardening, but be sure to choose a smaller variety and provide adequate support.
What’s the best way to ensure proper pollination?
Pollination is crucial for getting those full, juicy ears of sweet corn. As mentioned earlier, planting in blocks is key. You can also hand-pollinate if you’re concerned about pollination rates, especially in smaller gardens or during periods of low wind. To hand-pollinate, gently shake the tassels (the male flowers at the top of the plant) to release pollen, then brush the pollen onto the silks (the female flowers that emerge from the developing ears). Do this in the morning when the pollen is most active.
How do I know when my sweet corn is ready to harvest?
Knowing when to harvest is essential for getting the sweetest, most flavorful corn. The silk should be brown and dry, but still slightly moist to the touch. The ears should feel plump and full. You can also gently peel back a portion of the husk and pierce a kernel with your fingernail. If the liquid that comes out is milky, the corn is ready. If it’s clear, it needs more time. If it’s doughy, you’ve waited too long. Remember, sweet corn loses its sweetness quickly after harvest, so it’s best to cook it as soon as possible.
What are some common pests and diseases that affect sweet corn?
Sweet corn is susceptible to a variety of pests and diseases, including corn earworms, aphids, Japanese beetles, and fungal diseases like rust and smut. Regularly inspect your plants for signs of infestation or disease. Use organic pest control methods like insecticidal soap, neem oil, or hand-picking pests. Ensure good air circulation to prevent fungal diseases. Crop rotation can also help to reduce the risk of soilborne diseases.
Can I grow sweet corn in containers?
Yes, you can grow sweet corn in containers, but it requires some extra attention. Choose a large container (at least 12 inches in diameter and depth) and use a high-quality potting mix. Select a smaller variety of sweet corn that is well-suited for container gardening. Provide adequate support, such as stakes or trellises, to prevent the plants from toppling over. Water regularly and fertilize every two weeks with a balanced fertilizer. Remember that container-grown plants tend to dry out more quickly than those grown in the ground, so monitor the soil moisture carefully.
What kind of fertilizer should I use for sweet corn?
Sweet corn is a heavy feeder, meaning it requires a lot of nutrients to grow and produce those delicious ears. A balanced fertilizer with a ratio of 10-10-10 or 14-14-14 is a good starting point. Apply fertilizer at planting time and again when the plants are about knee-high. You can also side-dress with nitrogen fertilizer when the tassels begin to emerge. Organic options include compost, manure, and blood meal.
How often should I water my sweet corn?
Sweet corn needs consistent moisture, especially during pollination and ear development. Water deeply and regularly, aiming for about 1 inch of water per week. Avoid overhead watering, as this can promote fungal diseases. Use a soaker hose or drip irrigation to deliver water directly to the roots. Check the soil moisture regularly and adjust your watering schedule as needed, depending on the weather conditions.
Can I save seeds from my homegrown sweet corn?
While you can save seeds from your homegrown sweet corn, keep in mind that the resulting plants may not be true to type, especially if you’re growing hybrid varieties. Hybrid varieties are bred for specific traits, and their offspring may not inherit those traits. If you want to save seeds, choose an open-pollinated variety and isolate it from other corn varieties to prevent cross-pollination. Allow the ears to dry completely on the stalk, then remove the kernels and store them in a cool, dry place.
Leave a Comment