

Growing Violets Tips: Unlock the Secrets to a Blooming Indoor Oasis!
Have you ever admired those charming, velvety violet blooms and wished you could cultivate your own little patch of purple paradise indoors? Well, you’re in luck! This isn’t just another gardening guide; it’s your personal passport to becoming a violet virtuoso. For centuries, violets have captivated hearts with their delicate beauty and sweet fragrance. From adorning Victorian parlors to symbolizing love and remembrance, these little flowers boast a rich history and cultural significance.
But let’s be honest, sometimes growing violets can feel a bit… finicky. They’re not quite as straightforward as, say, a hardy succulent. That’s where these DIY tricks and hacks come in! I’m going to share my tried-and-true methods for nurturing these beauties, ensuring they thrive and reward you with a continuous cascade of blossoms. Forget complicated routines and expensive equipment. We’re talking simple, effective strategies that anyone can implement, regardless of their gardening experience.
Why do you need these tips? Because life’s too short for sad, struggling violets! Imagine the joy of having vibrant, healthy plants gracing your windowsill, adding a touch of elegance and cheer to your home. Plus, growing violets is incredibly rewarding – there’s nothing quite like the satisfaction of nurturing a plant from a tiny leaf to a flourishing bloom. So, let’s dive in and unlock the secrets to violet success!
Unlocking the Secrets to Thriving Violets: A DIY Guide
Hey plant lovers! Are you ready to dive into the enchanting world of African Violets? These beauties, with their velvety leaves and vibrant blooms, can brighten up any space. But let’s be honest, sometimes they can be a little… finicky. Don’t worry! I’m here to share my tried-and-true DIY tips and tricks to help you cultivate happy, healthy, and blooming African Violets. Get ready to transform your thumb from brown to green!
Understanding Your Violet’s Needs
Before we get our hands dirty, let’s talk about what makes these plants tick. Understanding their basic needs is crucial for success.
* Light: Violets love bright, indirect light. Think of a sunny windowsill with a sheer curtain. Direct sunlight can scorch their delicate leaves.
* Watering: This is where things get a bit tricky. Violets are sensitive to overwatering, which can lead to root rot. The key is to keep the soil consistently moist, but not soggy.
* Humidity: They thrive in higher humidity levels.
* Soil: A well-draining, slightly acidic potting mix is essential.
* Temperature: Violets prefer temperatures between 65-75°F (18-24°C).
* Fertilizing: Regular feeding with a balanced fertilizer will encourage blooming.
DIY Violet Potting Mix: The Foundation for Success
The right potting mix is the cornerstone of healthy violets. You can buy pre-made violet potting mix, but I find it’s more economical (and fun!) to create my own. Here’s my go-to recipe:
Ingredients:
* 1 part peat moss: This provides moisture retention and acidity.
* 1 part perlite: This improves drainage and aeration.
* 1 part vermiculite: This helps retain moisture and nutrients.
Instructions:
1. Gather your ingredients: Make sure you have all your components ready.
2. Combine the ingredients: In a large bowl or container, thoroughly mix the peat moss, perlite, and vermiculite.
3. Moisten the mix: Lightly dampen the mixture with water. It should be moist but not dripping wet.
4. Store or use immediately: You can store the mix in an airtight container for later use, or use it right away for potting your violets.
Watering Like a Pro: Avoiding the Dreaded Root Rot
Watering is arguably the most critical aspect of violet care. Overwatering is a common killer, so let’s master the art of proper hydration.
The Bottom Watering Method:
This is my preferred method because it minimizes the risk of getting water on the leaves, which can cause spots.
1. Prepare a basin: Fill a shallow basin or saucer with water.
2. Place the pot: Set your violet pot in the basin, allowing the water to soak up through the drainage holes.
3. Wait and observe: Let the pot sit in the water for about 15-20 minutes, or until the top of the soil feels slightly moist.
4. Remove and drain: Take the pot out of the basin and let any excess water drain away.
5. Frequency: Water when the top inch of soil feels dry to the touch. This will typically be every 7-10 days, but it depends on your environment.
Top Watering (If You Must):
If you prefer top watering, be extremely careful not to get water on the leaves.
1. Use a watering can with a long, narrow spout: This will help you direct the water to the soil.
2. Water gently: Slowly pour water onto the soil, avoiding the leaves.
3. Water until excess drains: Water until you see water draining from the bottom of the pot.
4. Remove excess water: Make sure to empty the saucer beneath the pot to prevent the plant from sitting in water.
DIY Humidity Boosters: Creating a Violet Paradise
Violets love humidity, but most homes aren’t naturally humid enough. Here are a few DIY ways to increase the humidity around your plants:
* Pebble Tray: Fill a shallow tray with pebbles and add water until the water level is just below the top of the pebbles. Place your violet pot on top of the pebbles. As the water evaporates, it will increase the humidity around the plant.
* Group Plants Together: Grouping plants together creates a microclimate with higher humidity.
* Humidifier: If you have a humidifier, place it near your violets.
DIY Fertilizer: Nourishing Your Violets for Blooms
Violets are heavy feeders, especially when they’re blooming. While you can use commercial violet fertilizer, I sometimes like to make my own diluted solution.
DIY Banana Peel Fertilizer:
Banana peels are rich in potassium, which is essential for blooming.
1. Collect banana peels: Save your banana peels.
2. Soak the peels: Place the peels in a jar or container and cover them with water.
3. Let it steep: Let the peels steep in the water for 1-2 days.
4. Strain the liquid: Strain the liquid and discard the peels.
5. Dilute the solution: Dilute the banana peel water with equal parts fresh water.
6. Fertilize your violets: Use the diluted solution to water your violets every 2-4 weeks during the growing season (spring and summer).
Important Note: Always dilute any homemade fertilizer to avoid burning the roots.
Repotting Your Violets: Giving Them Room to Grow
Repotting is necessary when your violet outgrows its pot or when the soil becomes depleted of nutrients.
1. Choose the right pot: Select a pot that is only slightly larger than the current pot. Violets prefer to be slightly root-bound.
2. Prepare the new pot: Fill the new pot with your DIY violet potting mix.
3. Remove the violet from its old pot: Gently loosen the soil around the edges of the pot and carefully remove the violet.
4. Inspect the roots: Check the roots for any signs of rot or disease. Trim away any damaged roots.
5. Place the violet in the new pot: Center the violet in the new pot and fill in around the roots with potting mix.
6. Water thoroughly: Water the violet thoroughly after repotting.
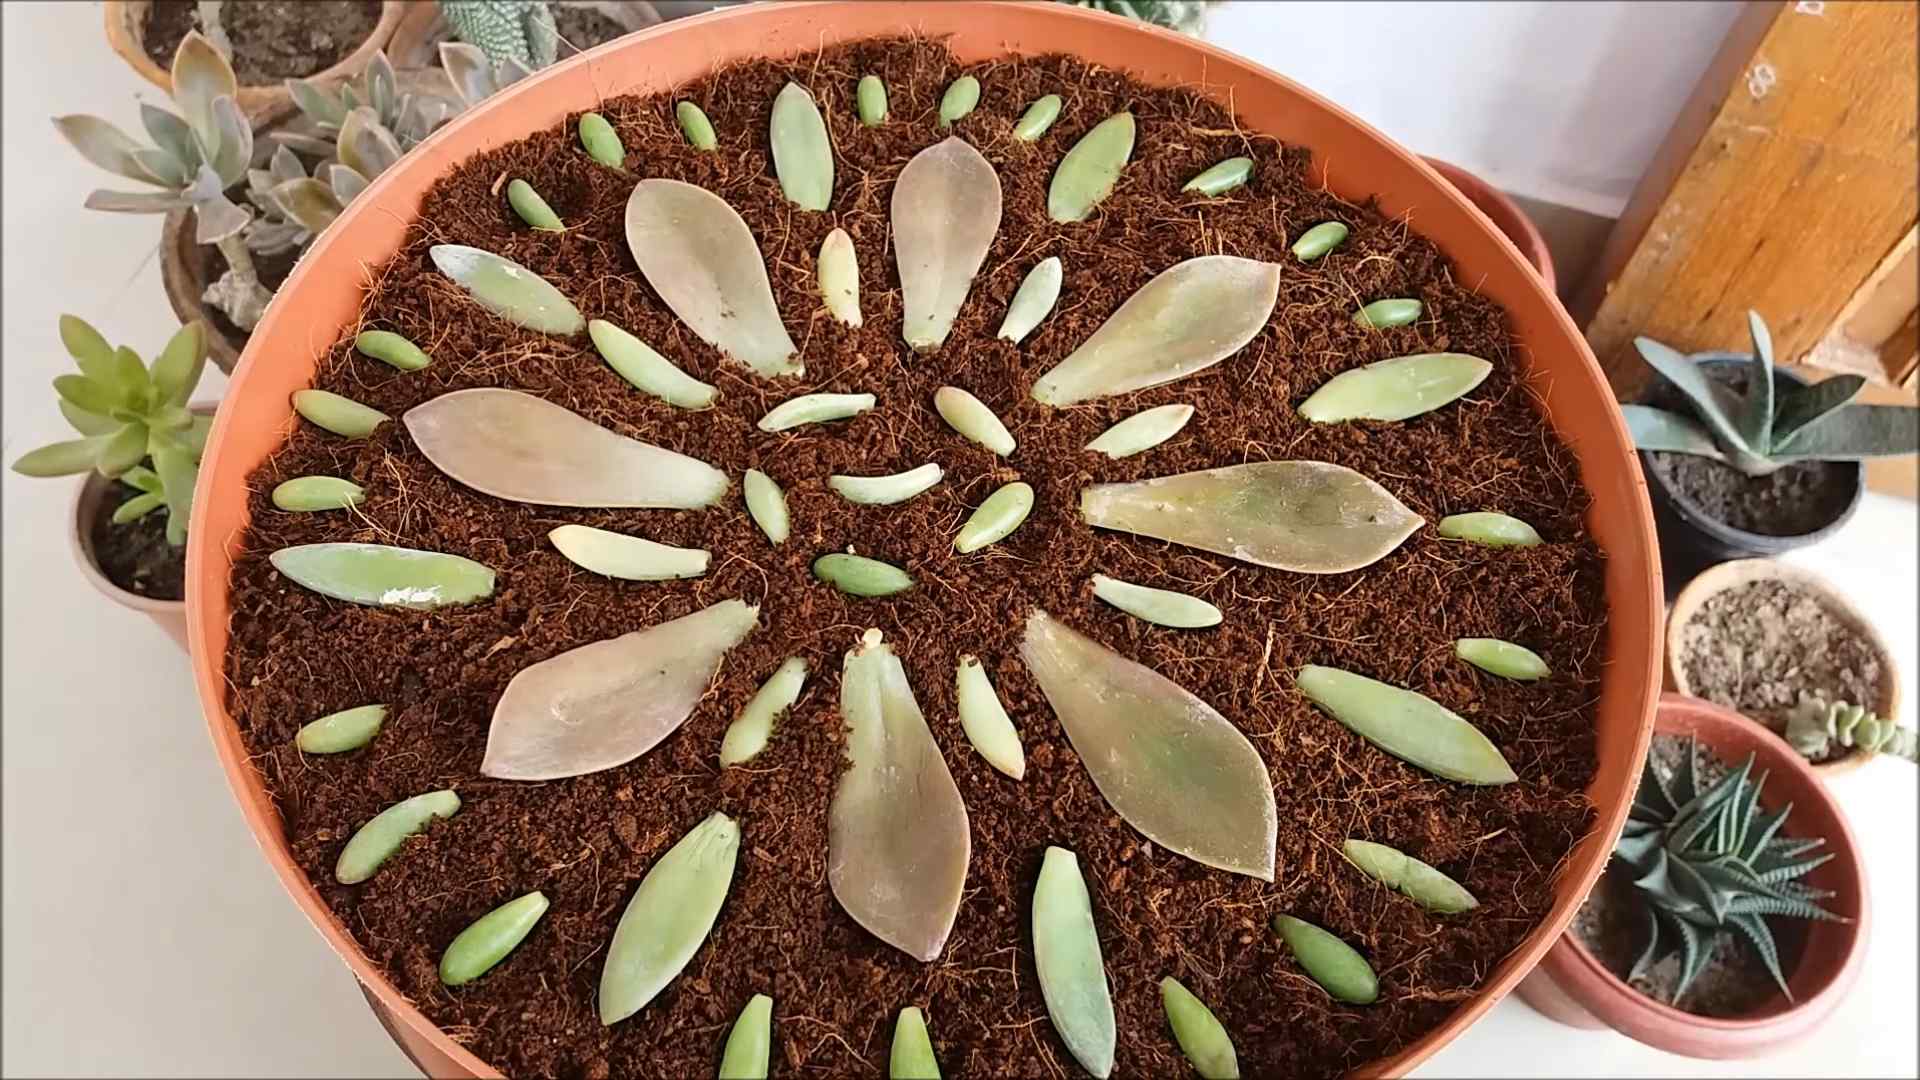
Propagating Violets: Multiplying Your Collection
One of the coolest things about violets is how easy they are to propagate from leaf cuttings. This is a fun and rewarding way to expand your collection or share with friends.
1. Select a healthy leaf: Choose a healthy, mature leaf from your violet.
2. Cut the leaf stem: Using a clean, sharp knife or scissors, cut the leaf stem at a 45-degree angle, about 1-2 inches from the leaf.
3. Prepare a rooting medium: You can use a small pot filled with your DIY violet potting mix or a glass of water.
4. Rooting in soil: Dip the cut end of the leaf stem in rooting hormone (optional, but it can speed up the process). Insert the stem into the potting mix, burying it about 1 inch deep. Water lightly and cover the pot with a plastic bag or dome to create a humid environment.
5. Rooting in water: Place the leaf stem in a glass of water, making sure the leaf itself doesn’t touch the water. Change the water every few days.
6. Wait for roots to form: It will take several weeks for roots to form. Once the roots are about 1 inch long, you can transplant the leaf into a small pot filled with your DIY violet potting mix.
7. Care for the new plant: Treat the new plant like a mature violet, providing it with bright, indirect light, proper watering, and humidity.
Troubleshooting Common Violet Problems
Even with the best care, you might encounter some problems along the way. Here are a few common issues and how to address them:
* Yellowing Leaves: This can be caused by overwatering, underwatering, or nutrient deficiencies. Adjust your watering schedule and fertilize regularly.
* Brown Spots on Leaves: This is often caused by water getting on the leaves. Avoid getting water on the leaves when watering.
* Lack of Blooms: This can be caused by insufficient light, improper fertilization, or temperature fluctuations. Move your violet to a brighter location, fertilize regularly, and maintain a consistent temperature.
* Root Rot: This is caused by overwatering. Repot the violet in fresh potting mix and be more careful with your watering schedule.
Keeping Your Violets Happy: A Few Extra Tips
*
Conclusion
So, there you have it! Mastering the art of growing violets doesn’t require a green thumb blessed by the gardening gods. It’s about understanding their needs, providing the right environment, and employing a few clever DIY tricks to give them that extra boost. This method, in particular, is a must-try because it addresses several key challenges violet growers often face: proper drainage, nutrient availability, and humidity control. By implementing this simple yet effective technique, you’re essentially creating a miniature ecosystem perfectly tailored to your violet’s needs.
Think of it as giving your violets a spa day, every day! The improved drainage prevents root rot, a common violet killer, while the slow-release nutrients ensure a steady supply of food without the risk of over-fertilizing. And let’s not forget the humidity boost, which is crucial for those delicate blooms to thrive.
But don’t stop there! Experiment with different variations to find what works best for your specific environment and violet variety. For instance, if you live in a particularly dry climate, consider adding a layer of pebbles to the bottom of your tray and keeping them consistently moist to further increase humidity. You could also try using different types of organic matter in your soil mix, such as coco coir or worm castings, to enhance nutrient content and drainage. If you’re feeling adventurous, try propagating new violets from leaf cuttings using this same method – the consistent moisture and humidity will significantly increase your success rate.
Growing violets can be a truly rewarding experience, and this DIY trick is your secret weapon to achieving vibrant, healthy plants that will bloom profusely. It’s a simple, cost-effective, and environmentally friendly way to give your violets the love and care they deserve.
Now, it’s your turn! We wholeheartedly encourage you to try this DIY trick for growing violets and witness the difference it makes. Don’t be afraid to experiment and adapt the method to suit your specific needs. And most importantly, share your experience with us! We’d love to hear about your successes, challenges, and any variations you’ve discovered. Post pictures of your thriving violets, share your tips in the comments section, and let’s create a community of violet enthusiasts who are passionate about growing these beautiful plants. Happy growing!
Frequently Asked Questions (FAQ)
What exactly is this DIY trick for growing violets?
This DIY trick focuses on creating an optimal growing environment for violets by improving drainage, nutrient availability, and humidity control. It typically involves using a self-watering system or a modified pot-in-pot setup with a well-draining soil mix and a reservoir of water to provide consistent moisture and humidity. The exact method can vary, but the core principle remains the same: to mimic the violet’s natural habitat and provide the ideal conditions for growth.
Why is drainage so important for violets?
Violets are susceptible to root rot, a condition caused by prolonged exposure to overly moist soil. Poor drainage allows water to accumulate around the roots, creating a breeding ground for harmful fungi and bacteria. This can lead to root damage, stunted growth, and ultimately, the death of the plant. Proper drainage ensures that excess water can escape, preventing the roots from becoming waterlogged and promoting healthy root development.
What kind of soil mix should I use for growing violets with this DIY trick?
A well-draining soil mix is crucial for success. Avoid using heavy garden soil, which tends to retain too much moisture. A good mix typically consists of equal parts peat moss, perlite, and vermiculite. You can also add a small amount of horticultural charcoal to further improve drainage and prevent fungal growth. Pre-made violet potting mixes are also readily available and can be a convenient option.
How often should I water my violets using this method?
The frequency of watering will depend on several factors, including the size of the pot, the type of soil mix, the humidity level, and the temperature. The key is to keep the soil consistently moist but not soggy. With a self-watering system or a pot-in-pot setup, the plant will draw water from the reservoir as needed. Check the reservoir regularly and refill it when it’s low. Avoid watering the leaves directly, as this can lead to spotting and fungal diseases.
Can I use regular tap water for my violets?
While tap water is generally safe for violets, it’s best to use filtered or distilled water if possible. Tap water often contains chlorine and other chemicals that can be harmful to sensitive plants. If you must use tap water, let it sit out for 24 hours to allow the chlorine to dissipate. Room temperature water is always preferable to cold water, which can shock the plant.
What kind of fertilizer should I use for growing violets?
Use a fertilizer specifically formulated for violets. These fertilizers typically have a higher phosphorus content, which promotes blooming. Follow the instructions on the fertilizer label carefully and avoid over-fertilizing, as this can burn the roots. A diluted solution of fertilizer applied every 2-4 weeks during the growing season is usually sufficient.
How much light do violets need?
Violets thrive in bright, indirect light. Avoid placing them in direct sunlight, which can scorch the leaves. An east-facing window is often ideal, providing gentle morning sun. If you don’t have access to natural light, you can use fluorescent grow lights. Position the lights about 12-18 inches above the plants and keep them on for 12-14 hours per day.
My violet isn’t blooming. What could be the problem?
There are several reasons why your violet might not be blooming. Common causes include insufficient light, improper watering, lack of nutrients, and temperature fluctuations. Make sure your violet is receiving adequate light, is being watered properly, and is being fertilized regularly. Also, ensure that the temperature is consistent and within the ideal range of 65-75°F (18-24°C).
How do I propagate violets from leaf cuttings?
Propagating violets from leaf cuttings is a relatively easy process. Select a healthy leaf from the center of the plant and cut it off with a clean, sharp knife. Insert the cut end of the leaf into a small pot filled with a well-draining soil mix. Cover the pot with a plastic bag or dome to create a humid environment. Keep the soil moist but not soggy. In a few weeks, new plantlets will begin to emerge from the base of the leaf. Once the plantlets are large enough, you can transplant them into individual pots.
What are some common pests and diseases that affect violets?
Common pests that affect violets include mealybugs, aphids, and spider mites. These pests can be controlled with insecticidal soap or neem oil. Common diseases include powdery mildew and root rot. Powdery mildew can be treated with a fungicide, while root rot can be prevented by ensuring proper drainage and avoiding overwatering. Regularly inspect your plants for signs of pests and diseases and take action promptly to prevent them from spreading.

Leave a Comment