

Hoarding cleanup tips DIY – sounds daunting, right? I get it! The thought of tackling a cluttered space, especially one that’s been accumulating for a while, can feel absolutely overwhelming. But trust me, you’re not alone, and more importantly, you can do this! Think of it as reclaiming your space and your peace of mind, one step at a time.
Throughout history, cultures have placed varying degrees of emphasis on order and cleanliness. While extreme hoarding is a recognized disorder, the struggle to declutter and organize is something many of us face. We live in a consumer-driven world, and it’s easy to accumulate things we don’t truly need. But the good news is, with the right hoarding cleanup tips DIY approach, you can transform your living space into a sanctuary.
Why do you need these DIY tricks and hacks? Because a cluttered home can lead to increased stress, anxiety, and even difficulty finding essential items. It can impact your relationships and your overall well-being. This article is packed with practical, actionable advice to help you break down the cleanup process into manageable chunks. I’ll share my favorite strategies for sorting, decluttering, and organizing, so you can finally say goodbye to the chaos and hello to a more peaceful and functional home. Let’s get started!
DIY Hoarding Cleanup: A Step-by-Step Guide to Reclaiming Your Space
Okay, let’s be honest, tackling a hoarding situation can feel incredibly overwhelming. I get it. It’s not just about clutter; it’s often tied to emotions, memories, and a whole lot of “what ifs.” But trust me, you can do this! I’m going to walk you through a manageable, step-by-step process to reclaim your space and your peace of mind. This isn’t a race; it’s a marathon. Be patient with yourself, celebrate small victories, and remember why you’re doing this.
Phase 1: Planning and Preparation
Before you even think about touching a single item, we need a plan. This is crucial for staying organized and preventing burnout.
* **Set Realistic Goals:** Don’t aim to clear the entire house in a weekend. Start small. Maybe focus on one corner of one room. Baby steps are key!
* **Gather Supplies:** You’ll need a good arsenal of tools. Trust me, having these on hand will make the process much smoother.
* Heavy-duty trash bags (lots of them!)
* Sturdy boxes (for donations and items to keep)
* Cleaning supplies (disinfectant wipes, all-purpose cleaner, glass cleaner, etc.)
* Gloves (protect those hands!)
* Mask (especially if there’s dust or mold)
* Box cutters or scissors
* Permanent markers (for labeling boxes)
* Duct tape (because duct tape fixes everything, right?)
* A notebook and pen (for taking notes and tracking progress)
* First-aid kit (just in case)
* **Create Sorting Zones:** Designate areas for different categories:
* **Trash:** Items that are broken, unusable, or have no value.
* **Donations:** Items in good condition that you no longer need.
* **Keep:** Items you want to keep and use.
* **Relocate:** Items that belong in a different part of the house.
* **Maybe:** Items you’re unsure about. We’ll revisit these later.
* **Enlist Support (Optional but Recommended):** This is a big task, and having a friend, family member, or professional organizer can make a huge difference. They can offer emotional support, help with decision-making, and provide an extra pair of hands. If you choose to involve others, be clear about your goals and boundaries.
* **Take “Before” Pictures:** This might seem silly, but trust me, it’s incredibly motivating to see how far you’ve come. Plus, it can be helpful for insurance purposes if there’s any damage.
Phase 2: The Decluttering Process
Okay, now for the main event! Remember to take breaks, stay hydrated, and don’t be afraid to ask for help.
1. **Start Small:** Choose that one corner or small area you identified in the planning phase. This will give you a sense of accomplishment without feeling overwhelmed.
2. **The Four-Box Method:** This is my go-to strategy for decluttering. Grab your trash bags, donation boxes, keep boxes, and relocate boxes.
3. **Handle Each Item Once:** This is the golden rule of decluttering. Pick up an item, make a decision, and immediately place it in the appropriate box or bag. Don’t put it down to “think about it later.” That’s how clutter accumulates!
4. **Ask Yourself Key Questions:** When deciding whether to keep an item, ask yourself these questions:
* Have I used this in the past year?
* Do I love it?
* Is it useful?
* Would I buy it again today?
* Do I have duplicates?
* Is it taking up valuable space?
* Am I keeping it out of guilt or obligation?
5. **Be Honest with Yourself:** This is the hardest part. It’s easy to make excuses for keeping things, but be honest about whether you truly need or want an item.
6. **Tackle the “Maybe” Pile Later:** If you’re truly unsure about an item, put it in the “Maybe” box. But set a deadline (e.g., one month) to revisit it. If you haven’t used it or thought about it in that time, it’s probably safe to donate or discard it.
7. **Don’t Get Sidetracked by Memories:** It’s natural to get emotional when going through old belongings. But try not to get bogged down in reminiscing. If an item triggers strong emotions, set it aside and deal with it later.
8. **Focus on Progress, Not Perfection:** Don’t get discouraged if you don’t make as much progress as you hoped. Every little bit counts. Celebrate your accomplishments, no matter how small.
9. **Take Breaks:** Decluttering can be physically and emotionally draining. Take regular breaks to rest, stretch, and recharge.
10. **Document Important Items:** As you declutter, you might find important documents, photos, or sentimental items. Create a separate box for these and make sure they’re stored safely.
Phase 3: Cleaning and Organizing
Once you’ve decluttered, it’s time to clean and organize the remaining items. This will help you maintain your progress and create a more functional and enjoyable space.
1. **Deep Clean:** Now that the clutter is gone, give the area a thorough cleaning. Dust, vacuum, mop, and wipe down all surfaces. Pay attention to areas that were previously hidden by clutter.
2. **Organize What’s Left:** Put everything back in its place, but be mindful of how you organize it. Group similar items together, use storage containers to maximize space, and make sure everything is easily accessible.
3. **Maximize Vertical Space:** Use shelves, drawers, and wall-mounted organizers to take advantage of vertical space. This will help you keep surfaces clear and create a more open feel.
4. **Label Everything:** Labeling boxes, containers, and shelves will make it easier to find things and keep everything organized.
5. **Create a System for Maintaining Order:** Once you’ve decluttered and organized, it’s important to create a system for maintaining order. This might involve setting aside a few minutes each day to tidy up, or doing a more thorough cleaning and decluttering session once a week.
6. **One In, One Out Rule:** For every new item you bring into the house, get rid of one old item. This will help prevent clutter from accumulating again.
7. **Regularly Reassess:** Periodically reassess your belongings and declutter as needed. This will help you stay on top of things and prevent hoarding from recurring.
Phase 4: Dealing with Sentimental Items
This is often the trickiest part. It’s hard to let go of items that hold sentimental value, even if they’re no longer useful or needed.
1. **Acknowledge Your Feelings:** It’s okay to feel sad, nostalgic, or even guilty about letting go of sentimental items. Acknowledge these feelings and allow yourself to grieve.
2. **Ask Yourself Why You’re Keeping It:** Are you keeping it because you truly love it, or because you feel obligated to? Are you keeping it out of guilt or fear of forgetting the person or event associated with it?
3. **Create a Memory Box:** If you’re struggling to let go of sentimental items, create a memory box. Choose a few of your most cherished items and store them in a special box. This will allow you to keep the memories alive without cluttering your home.
4. **Take Photos:** If you can’t bear to part with an item, take a photo of it. This will allow you to preserve the memory without keeping the physical object.
5. **Repurpose or Upcycle:** Consider repurposing or upcycling sentimental items. For example, you could turn old t-shirts into a quilt, or use old jewelry to create a new piece of art.
6. **Share the Memories:** Share the stories and memories associated with the items with loved ones. This will help you keep the memories alive and connect with others.
7. **Let Go with Gratitude:** When you’re ready to let go of a sentimental item, do so with gratitude. Thank the item for the memories it holds, and then release it with love.
Phase 5: Disposal and Donation
Now that you’ve decluttered, it’s time to dispose of the trash and donate the items you no longer need.
1. **Dispose of Trash Responsibly:** Dispose of trash in accordance with local regulations. Consider recycling whenever possible.
2. **Donate to Charity:** Donate usable items to a local charity or non-profit organization. This will give your unwanted items a new life and help those in need.
3. **Sell Items Online or at a Garage Sale:** If you have valuable items that you no longer need, consider selling them online or at a

Conclusion
So, there you have it! Transforming your overwhelming hoarding situation into a manageable and even enjoyable cleanup project is entirely within your reach with these DIY hoarding cleanup tips. We’ve explored practical strategies, from the initial assessment and decluttering to the deep cleaning and organization that will ultimately reclaim your space and your peace of mind. This isn’t just about tidying up; it’s about creating a healthier, safer, and more functional living environment.
The beauty of these DIY methods lies in their adaptability. You can tailor them to your specific needs, the severity of the hoard, and your personal preferences. Feeling overwhelmed by the sheer volume? Break down the project into even smaller, more manageable chunks. Focus on one drawer, one shelf, or even just one category of items at a time. Celebrate each small victory to maintain momentum and motivation.
Consider these variations to personalize your hoarding cleanup even further:
* **Themed Cleanup Days:** Dedicate specific days to particular categories of items. For example, “Clothing Cleanup Saturday” or “Paperwork Purge Sunday.” This focused approach can make the task less daunting.
* **Enlist a Buddy:** Having a friend or family member assist you can provide invaluable support, both emotional and practical. They can offer a fresh perspective, help with decision-making, and provide much-needed encouragement.
* **Donation Station:** Designate a specific area for items you intend to donate. This visual reminder of your progress can be incredibly motivating. Research local charities and organizations that accept the types of items you’re decluttering.
* **Upcycling and Repurposing:** Before discarding items, consider whether they can be upcycled or repurposed. This not only reduces waste but also adds a creative element to the cleanup process. Old t-shirts can become cleaning rags, and glass jars can be used for storage.
* **Mindful Decluttering:** Practice mindfulness during the decluttering process. Take a moment to appreciate the item, acknowledge its purpose, and then consciously decide whether to keep it, donate it, or discard it. This can help you overcome emotional attachments and make more rational decisions.
Remember, the key to successful hoarding cleanup is consistency and patience. Don’t expect to transform your space overnight. It’s a journey, not a race. Be kind to yourself, celebrate your progress, and don’t be afraid to seek professional help if you need it.
We are confident that these DIY hoarding cleanup tips will empower you to take control of your space and create a more comfortable and fulfilling living environment. We encourage you to try these methods and share your experiences with us. What worked best for you? What challenges did you encounter? Your insights can help others who are embarking on their own hoarding cleanup journeys. Share your stories, tips, and before-and-after photos in the comments below! Let’s create a supportive community where we can all learn from each other and inspire positive change.
Frequently Asked Questions (FAQ)
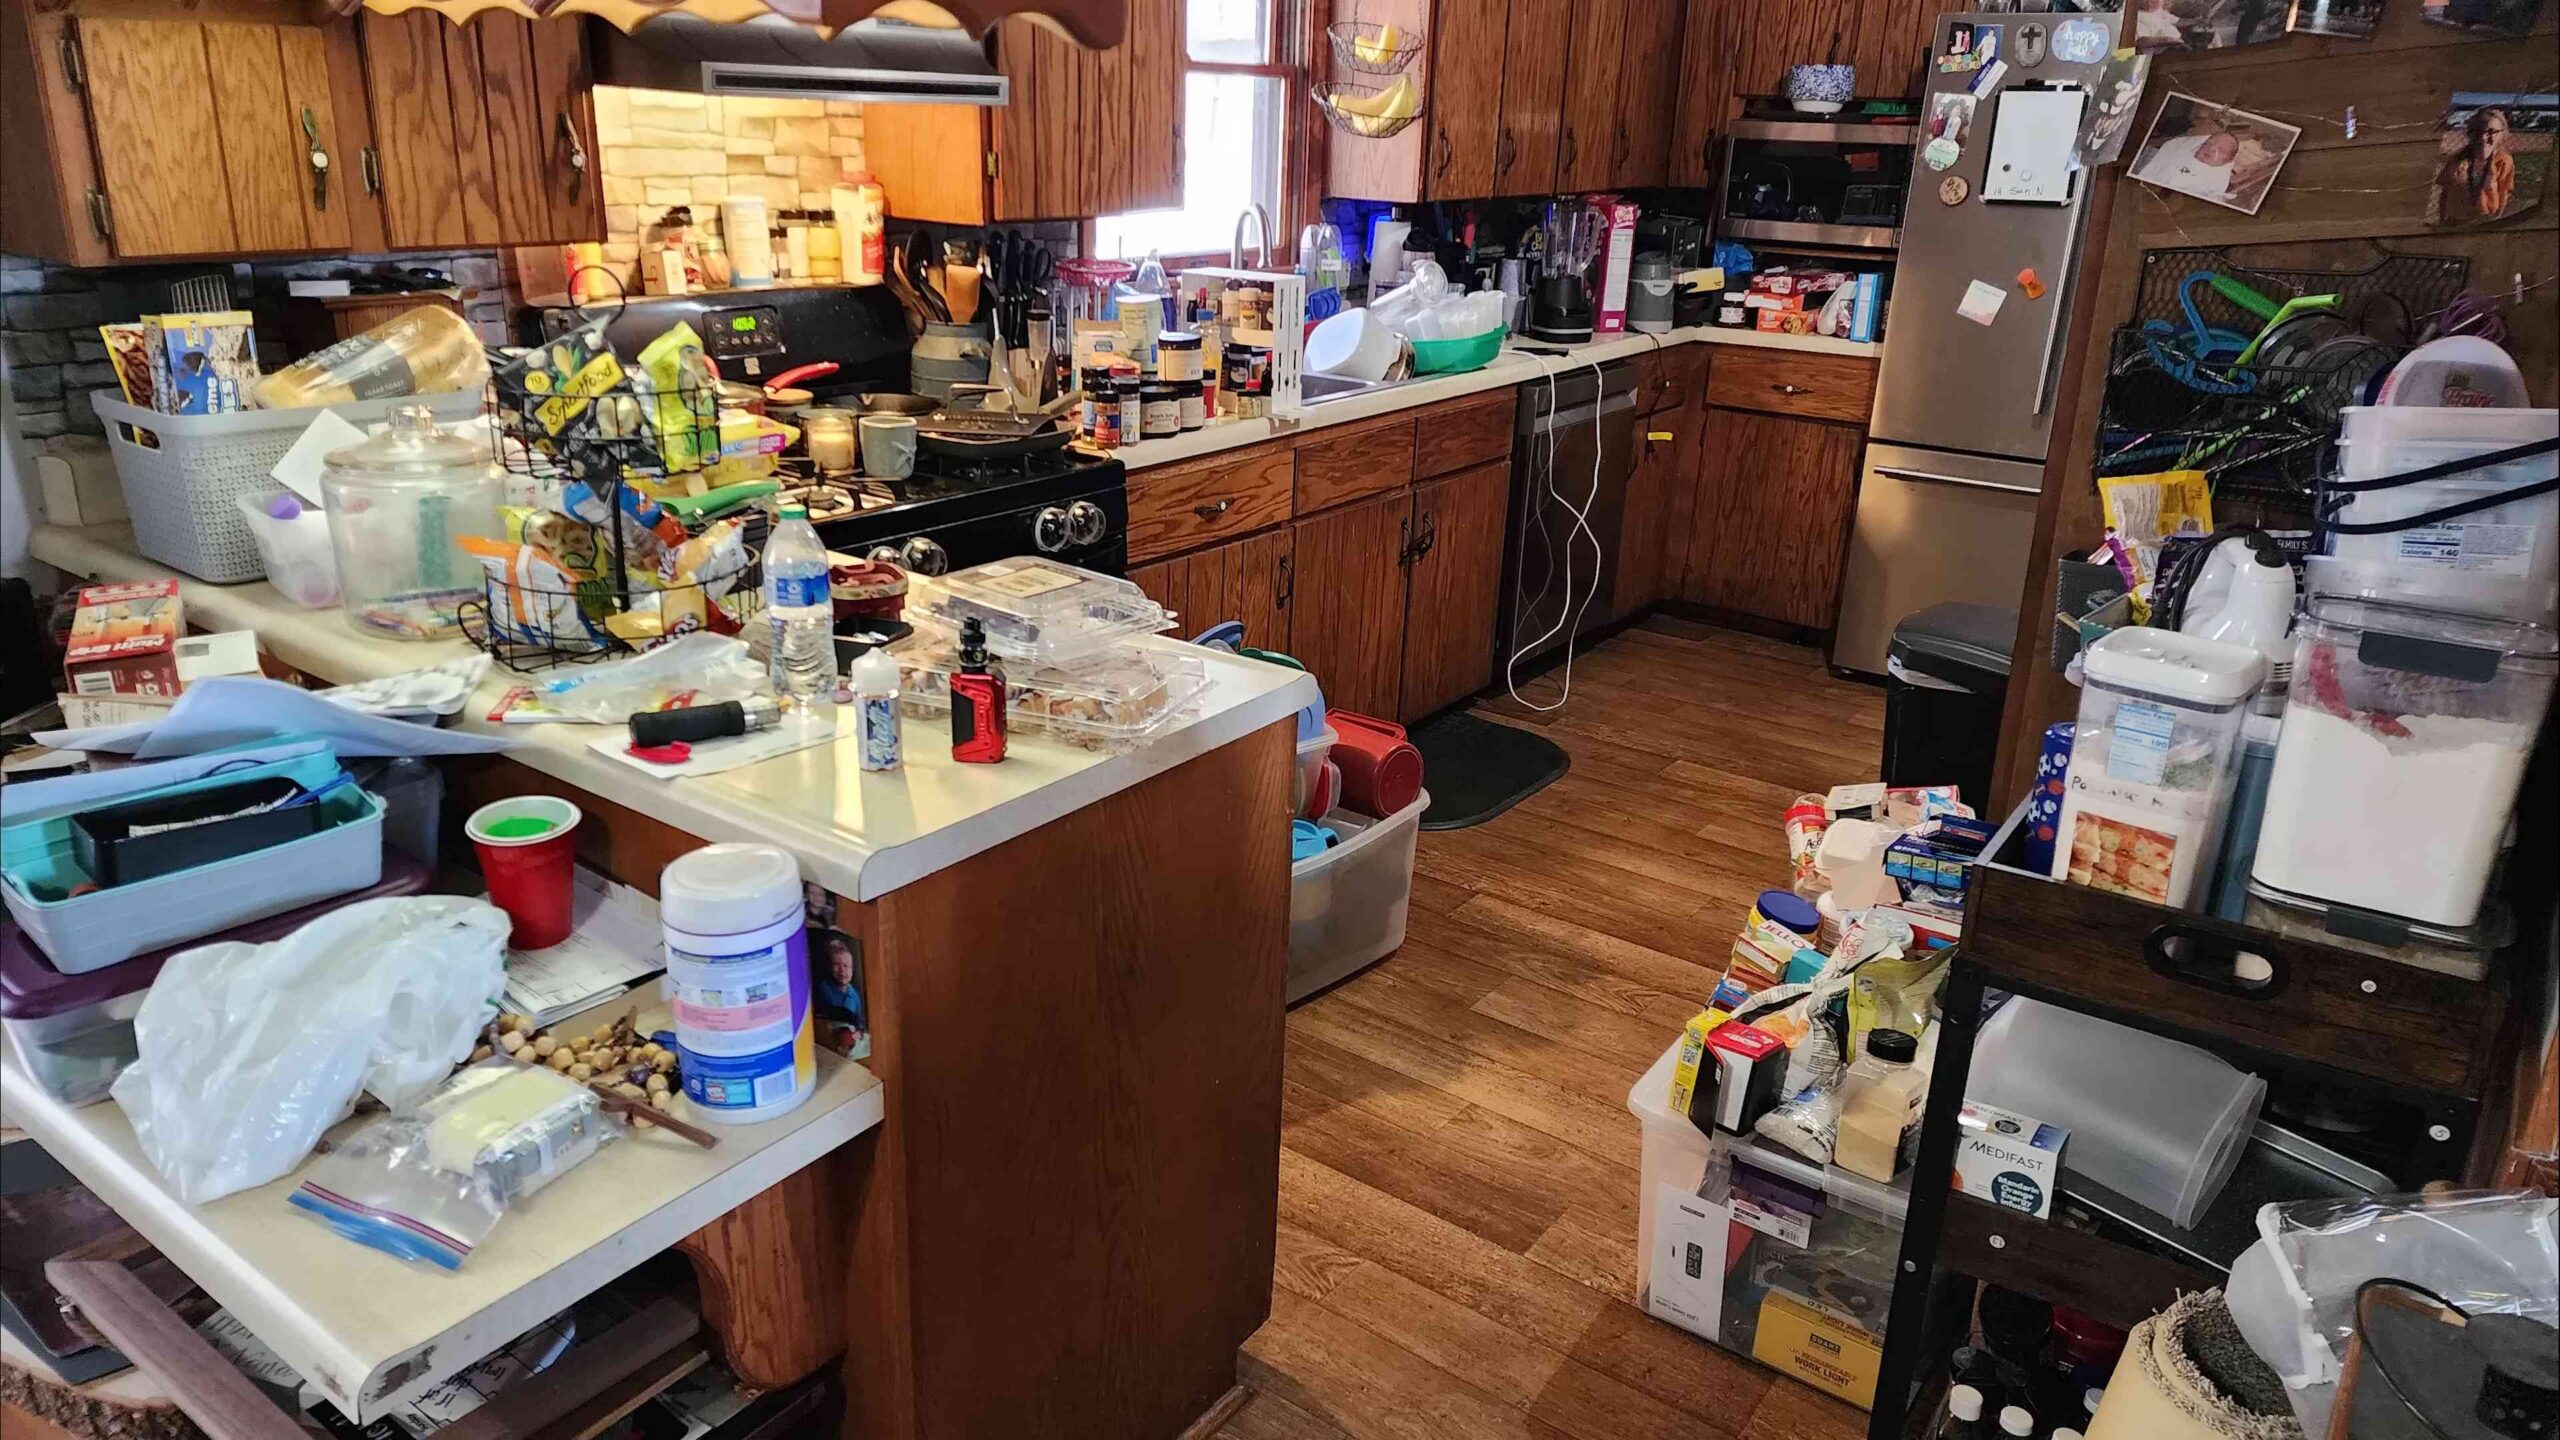
What is considered hoarding and how do I know if I have a problem?
Hoarding is a persistent difficulty discarding or parting with possessions because of a perceived need to save them. A person with hoarding disorder experiences distress at the thought of getting rid of the items. Excessive accumulation of items, regardless of actual value, occurs. This often results in clutter that compromises living areas and substantially interferes with the intended use of the space.
Signs of a hoarding problem include:
* Difficulty discarding items, regardless of their value.
* Excessive accumulation of items, leading to clutter.
* Living spaces that are unusable due to clutter.
* Distress or anxiety when thinking about discarding items.
* Significant impairment in daily functioning due to hoarding.
* Social isolation due to the condition of the home.
* Health and safety hazards created by the clutter.
If you recognize these signs in yourself or a loved one, it’s important to seek professional help.
How do I start cleaning a hoarded house?
Starting a hoarding cleanup can feel overwhelming, but breaking it down into smaller steps can make it more manageable:
1. **Assess the Situation:** Take a realistic look at the scope of the problem. Identify the areas that pose the greatest safety risks (e.g., blocked exits, fire hazards).
2. **Create a Plan:** Develop a detailed plan that outlines your goals, timeline, and strategies. Prioritize areas to clean and set realistic expectations.
3. **Gather Supplies:** Assemble essential cleaning supplies, including trash bags, boxes, cleaning solutions, gloves, masks, and protective clothing.
4. **Declutter One Area at a Time:** Focus on one small area at a time, such as a drawer, shelf, or corner. Avoid getting overwhelmed by the entire house.
5. **Sort Items:** Sort items into categories: trash, donate, keep, and relocate. Be honest with yourself about what you truly need and use.
6. **Dispose of Trash:** Remove all trash and debris from the area.
7. **Clean and Organize:** Thoroughly clean the area and organize the remaining items.
8. **Repeat:** Continue this process, one area at a time, until the entire house is cleaned and organized.
What are some tips for decluttering when you have a hard time letting go of things?
Letting go of possessions can be emotionally challenging, especially for individuals with hoarding tendencies. Here are some tips to make the process easier:
* **Start Small:** Begin with items that are easier to part with, such as duplicates, broken items, or items you haven’t used in years.
* **Ask Yourself Questions:** When deciding whether to keep an item, ask yourself questions like: “Have I used this in the past year?” “Do I need this?” “Does this bring me joy?” “Could someone else benefit from this more than I do?”
* **Set Limits:** Establish limits for how many of certain items you will keep. For example, decide to keep only five pairs of jeans or ten books.
* **Take Photos:** If you’re struggling to let go of sentimental items, take photos of them. This can help you preserve the memories without keeping the physical object.
* **Focus on the Benefits:** Remind yourself of the benefits of decluttering, such as creating a safer, more functional living space, reducing stress, and improving your overall well-being.
* **Seek Support:** Enlist the help of a friend, family member, or professional organizer to provide support and guidance.
* **The One-In-One-Out Rule:** For every new item you bring into your home, get rid of one similar item. This helps prevent clutter from accumulating.
* **Consider the Cost of Keeping:** Think about the cost of keeping an item, not just in terms of money, but also in terms of space, time, and mental energy.
What are the health and safety risks associated with hoarding?
Hoarding can create significant health and safety hazards, including:
* **Fire Hazards:** Clutter can block exits, making it difficult to escape in case of a fire. Accumulated paper and other flammable materials can also increase the risk of fire.
* **Trip and Fall Hazards:** Piles of clutter can create tripping hazards, leading to falls and injuries.
* **Poor Air Quality:** Dust, mold, and allergens can accumulate in cluttered environments, leading to respiratory problems.
* **Rodent and Pest Infestations:** Clutter provides hiding places and breeding grounds for rodents and pests, which can spread diseases.
* **Structural Damage:** Excessive weight from accumulated items can damage the structure of the house.
* **Poor Sanitation:** Clutter can make it difficult to clean and maintain proper hygiene, increasing the risk of illness.
* **Mental Health Issues:** Hoarding can exacerbate mental health issues such as anxiety, depression, and social isolation.
When should I seek professional help for hoarding?
It’s important to seek professional help for hoarding if:
* The clutter is significantly impacting your daily life.
* You’re experiencing distress or anxiety related to hoarding.
* The clutter is creating health and safety hazards.
* You’re unable to declutter on your own.
* Hoarding is affecting your relationships or social life.
* You’ve tried to declutter in the past but haven’t been successful.
Professional help may include therapy, medication, or professional organizing services. A therapist can help you address the underlying emotional and psychological issues that contribute to hoarding, while a professional organizer can provide practical assistance with decluttering and organizing. Remember, seeking help is a sign of strength, not weakness. Taking that first step can lead to a healthier, safer, and more fulfilling life.

Leave a Comment