

Mushroom Growing Recycled Cans: Who knew turning trash into treasure could be so delicious and rewarding? I’m so excited to share this incredibly fun and eco-friendly DIY project with you! For centuries, mushrooms have been revered across cultures, not just for their unique flavor profiles but also for their medicinal properties. From ancient Roman feasts to traditional Chinese medicine, these fungi have held a special place in human history.
But let’s be honest, buying fresh mushrooms from the store can get expensive, and sometimes they just don’t have the variety you’re craving. That’s where this amazing DIY trick comes in! Imagine being able to cultivate your own gourmet mushrooms right in your kitchen, using something you’d normally toss in the recycling bin.
This article will guide you through the simple steps of mushroom growing recycled cans. Not only is it a fantastic way to reduce waste and contribute to a more sustainable lifestyle, but it also provides you with a constant supply of fresh, organic mushrooms. Plus, it’s a super cool conversation starter! So, grab those empty cans, and let’s get growing!
Growing Mushrooms in Recycled Cans: A Fun and Sustainable DIY Project
Hey there, fellow mushroom enthusiasts! Ever thought about growing your own delicious mushrooms right in your kitchen, using nothing but recycled cans? It’s easier than you think, super rewarding, and a fantastic way to give those empty cans a new lease on life. I’m going to walk you through the whole process, step-by-step, so you can enjoy fresh, homegrown mushrooms in no time.
What You’ll Need
Before we dive in, let’s gather our supplies. This is what you’ll need to get started:
* Recycled Cans: Clean, empty cans of various sizes. Think soup cans, vegetable cans, even coffee cans! Make sure they’re thoroughly washed and any sharp edges are filed down or covered with tape.
* Mushroom Spawn: This is the “seed” of your mushrooms. You can find mushroom spawn online or at your local garden center. Oyster mushrooms are a great choice for beginners because they’re relatively easy to grow.
* Substrate: This is the material the mushroom spawn will feed on. Some good options include:
* Straw: Chopped straw is a readily available and affordable option.
* Coffee Grounds: Used coffee grounds are a fantastic, sustainable choice. Make sure they’re cooled and drained.
* Hardwood Sawdust: This is another excellent option, especially for certain mushroom varieties.
* Spray Bottle: For misting the mushrooms to keep them hydrated.
* Gloves: To keep everything clean and prevent contamination.
* Rubbing Alcohol: For sterilizing your work area and tools.
* Plastic Bags or Clear Plastic Wrap: To create a humid environment.
* Drill (Optional): For creating drainage holes in the cans.
* Duct Tape (Optional): For covering sharp edges or reinforcing the cans.
Preparing the Cans and Substrate
This is a crucial step to ensure your mushrooms have a healthy environment to grow in.
1. Clean and Sanitize the Cans: Wash the cans thoroughly with soap and water. Rinse them well to remove any residue. Then, sterilize the inside of the cans with rubbing alcohol. Let them air dry completely. This helps prevent mold and other contaminants from interfering with your mushroom growth.
2. Create Drainage (Optional): If you’re concerned about waterlogging, you can drill a few small drainage holes in the bottom of the cans. This is especially important if you’re using a substrate that retains a lot of moisture, like coffee grounds.
3. Prepare the Substrate: The preparation method depends on the type of substrate you’re using.
* Straw: Chop the straw into small pieces (2-3 inches long). Pasteurize the straw by soaking it in hot water (around 160-180°F) for about an hour. This kills off any competing organisms. Let the straw cool completely before using it.
* Coffee Grounds: Make sure the coffee grounds are cooled and drained. You don’t need to pasteurize them, as the brewing process already does that.
* Hardwood Sawdust: Pasteurize the sawdust by steaming it for about an hour. Let it cool completely before using it.
Inoculating the Substrate
This is where the magic happens! We’re introducing the mushroom spawn to the substrate, allowing it to colonize and eventually produce mushrooms.
1. Wear Gloves: This is important to prevent contamination.
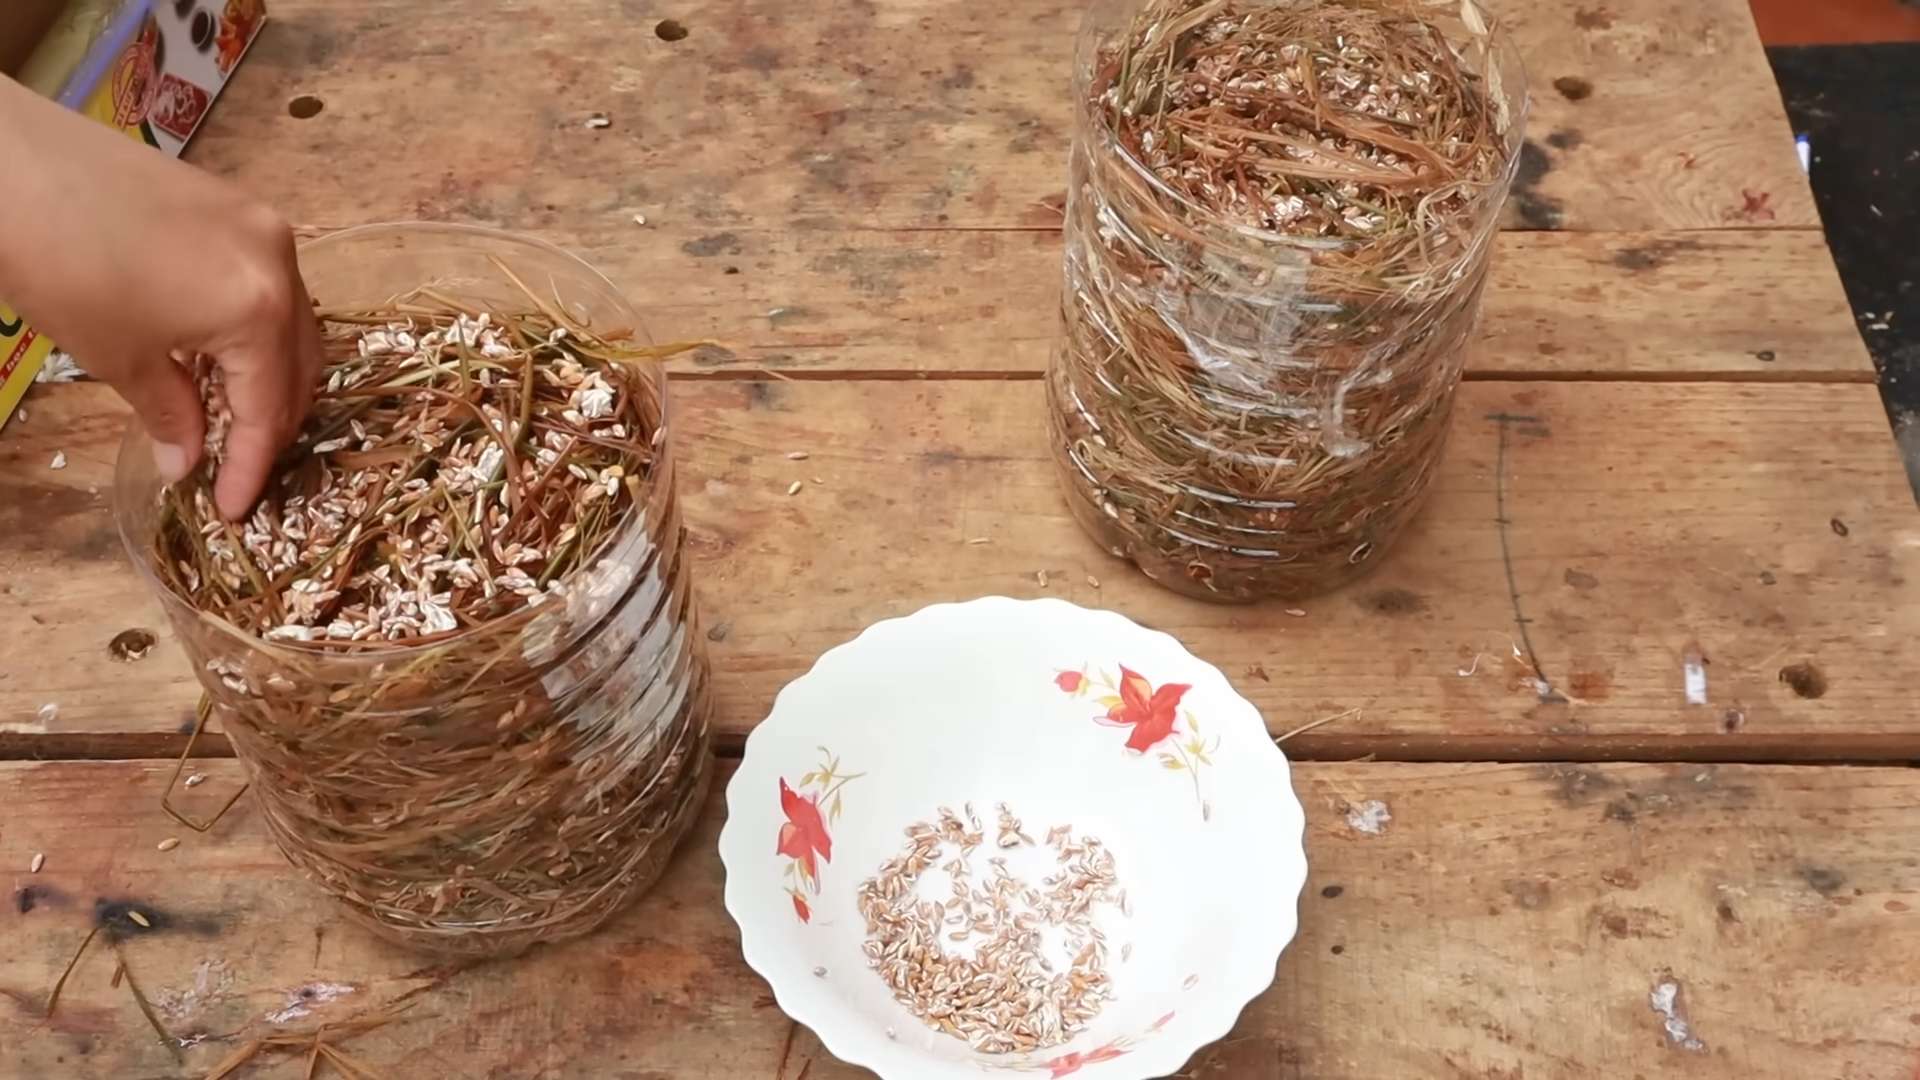
2. Layer the Substrate and Spawn: In the prepared can, create alternating layers of substrate and mushroom spawn. Start with a layer of substrate at the bottom, then sprinkle a layer of spawn on top. Repeat this process until the can is almost full, ending with a layer of substrate. A good ratio is about 1 part spawn to 10 parts substrate.
3. Pack Lightly: Don’t pack the substrate too tightly, as this can restrict airflow. You want the mycelium (the vegetative part of the mushroom) to be able to breathe.
4. Cover the Can: Cover the top of the can with a plastic bag or clear plastic wrap. This will help maintain humidity. You can secure the bag with a rubber band or tape.
Incubation
This is the period where the mushroom spawn colonizes the substrate. It’s like giving the mushrooms a cozy place to grow their roots.
1. Find a Dark, Cool Place: Place the inoculated cans in a dark, cool place with good ventilation. A basement, closet, or even under the sink can work well. The ideal temperature is around 65-75°F (18-24°C).
2. Monitor Humidity: Check the cans regularly to make sure the substrate is moist but not soggy. If it seems dry, mist it lightly with a spray bottle.
3. Wait for Colonization: This process can take anywhere from 2 to 4 weeks, depending on the type of mushroom and the environmental conditions. You’ll know the substrate is fully colonized when it’s covered in a white, fluffy substance – that’s the mycelium!
Fruiting
Now for the exciting part – getting those mushrooms to actually grow!
1. Increase Humidity: Once the substrate is fully colonized, it’s time to increase the humidity. You can do this by placing the cans in a humidity tent or by misting them frequently.
2. Introduce Light: Move the cans to a location with indirect light. Mushrooms don’t need a lot of light, but they do need some to trigger fruiting.
3. Maintain Temperature: Keep the temperature in the same range as during incubation (65-75°F or 18-24°C).
4. Mist Regularly: Mist the mushrooms several times a day to keep them hydrated. The substrate should be moist, but not waterlogged.
5. Look for Pinheads: After a few days, you should start to see small mushroom “pinheads” forming on the surface of the substrate. These will eventually grow into mature mushrooms.
Harvesting
Harvest time! This is the moment you’ve been waiting for.
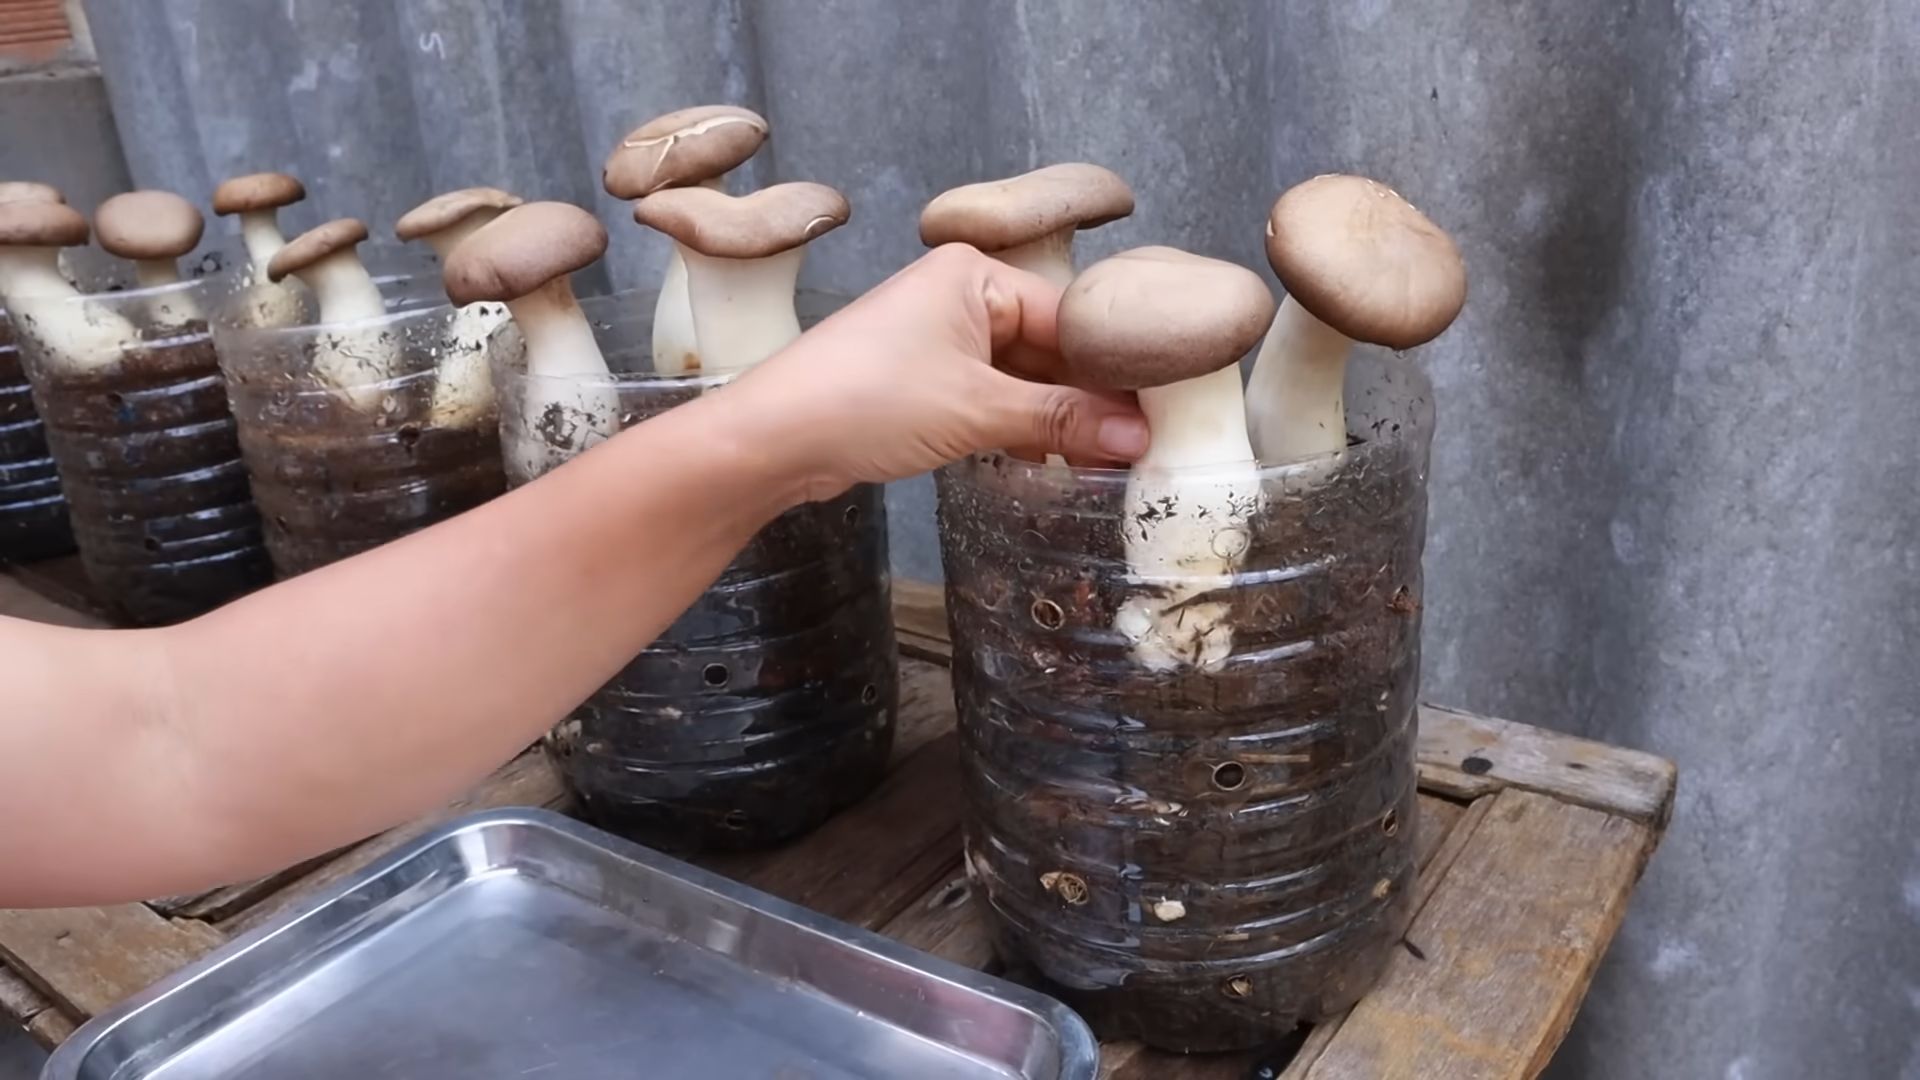
1. Harvest When Mature: Harvest the mushrooms when they’re fully grown but before they start to drop spores. The exact timing will depend on the type of mushroom you’re growing. For oyster mushrooms, harvest them when the caps are still slightly curled under.
2. Twist and Pull: To harvest, gently twist and pull the mushrooms from the substrate. You can also use a sharp knife to cut them off at the base.
3. Enjoy Your Harvest: Enjoy your fresh, homegrown mushrooms! They’re delicious sautéed, grilled, or added to soups and stews.
Second Flush (and Beyond!)
The good news is, you can often get multiple flushes of mushrooms from the same can.
1. Soak the Substrate: After harvesting the first flush, soak the substrate in water for a few hours. This will rehydrate it and encourage another flush of mushrooms.
2. Repeat the Fruiting Process: Return the can to the fruiting environment and repeat the misting and monitoring process.
3. Expect Smaller Yields: Each subsequent flush will likely produce fewer mushrooms than the first.
4. Compost the Substrate: After a few flushes, the substrate will be depleted of nutrients. You can then compost it and use it to enrich your garden soil.
Troubleshooting
Sometimes things don’t go exactly as planned. Here are a few common problems and how to fix them:
* Mold: If you see mold growing in your can, it’s important to remove it immediately. You can try scraping it off and spraying the area with rubbing alcohol. If the mold is widespread, it’s best to discard the entire can to prevent it from spreading to other cultures.
* Dry Substrate: If the substrate is too dry, the mushrooms won’t grow properly. Mist the substrate more frequently to keep it moist.
* Lack of Pinheads: If you’re not seeing any pinheads forming, it could be due to a lack of humidity, light, or proper temperature. Make sure you’re providing the right conditions for fruiting.
* Small Mushrooms: If the mushrooms are small and stunted, it could be due to a lack of nutrients or poor ventilation. Try adding a small amount of nutrient-rich material to the substrate or improving airflow around the cans.
Tips for Success
Here are a few extra tips to help you succeed with your mushroom growing project:
* Start Small: Don’t try to grow too many mushrooms at once. Start with a few cans and gradually increase the number as you gain experience.
* Be Patient: Mushroom growing takes time and patience. Don’t get discouraged if you don’t see results immediately.
* Keep Things Clean:
Conclusion
So, there you have it! Transforming humble recycled cans into thriving mushroom farms is not just a quirky DIY project; it’s a sustainable, cost-effective, and incredibly rewarding way to enjoy fresh, delicious mushrooms right from your own home. We’ve walked you through the simple steps, highlighting the ease and accessibility of this method. Forget expensive mushroom growing kits or relying solely on store-bought varieties. With a little patience and some repurposed materials, you can cultivate a continuous supply of your favorite fungi.
Why is this DIY mushroom growing trick a must-try? Firstly, it’s environmentally conscious. You’re giving discarded cans a new lease on life, reducing waste and contributing to a more sustainable lifestyle. Secondly, it’s budget-friendly. The primary materials are readily available and often free, making it a far cheaper alternative to purchasing mushrooms regularly. Thirdly, it’s educational and engaging. You’ll learn about the fascinating life cycle of mushrooms and gain a deeper appreciation for the natural world. And finally, it’s incredibly satisfying to harvest your own homegrown mushrooms, knowing you nurtured them from start to finish.
But the fun doesn’t stop there! Feel free to experiment with different mushroom varieties. Oyster mushrooms are particularly well-suited for this method due to their aggressive growth and tolerance for various substrates. However, you could also try growing shiitake, lion’s mane, or even wine cap mushrooms, depending on your climate and the availability of spawn. Consider using different substrates as well. While we recommended coffee grounds and straw, you could also explore using cardboard, sawdust, or even wood chips. Just be sure to properly sterilize any substrate to prevent contamination.
Another variation to consider is the size and shape of your recycled can mushroom farms. Experiment with different can sizes to see which works best for your chosen mushroom variety. You can also get creative with the aesthetics. Paint the cans, decorate them with labels, or even create a vertical mushroom garden by stacking multiple cans on top of each other. The possibilities are endless!
Don’t be intimidated by the process. Mushroom growing can seem daunting at first, but this method is designed to be simple and accessible for beginners. The key is to maintain a clean environment, provide adequate moisture, and be patient. Remember to research the specific needs of the mushroom variety you choose to grow, as different species have different requirements.
We are confident that you’ll find this DIY mushroom growing project to be both enjoyable and rewarding. So, gather your recycled cans, prepare your substrate, and get ready to embark on a fascinating journey into the world of fungi. We encourage you to try this amazing mushroom growing technique and share your experiences with us! Post photos of your mushroom farms on social media using #RecycledCanMushrooms and let us know what you’ve learned. We can’t wait to see your creations and hear about your success stories! Happy growing!
Frequently Asked Questions (FAQ)
What types of mushrooms are best suited for growing in recycled cans?
Oyster mushrooms are generally considered the easiest and most reliable choice for beginners. They are fast-growing, tolerant of a wide range of conditions, and produce delicious, meaty mushrooms. Other good options include shiitake, lion’s mane, and wine cap mushrooms, but these may require more specific conditions and attention. Research the specific needs of your chosen mushroom variety before you begin.
How do I sterilize the substrate to prevent contamination?
Sterilization is crucial to prevent unwanted molds and bacteria from outcompeting your mushroom spawn. For coffee grounds, you can pasteurize them by heating them in a pot of water to around 160-180°F (71-82°C) for about an hour. For straw, you can soak it in hot water (around 160°F) for several hours or even overnight. You can also use a pressure cooker for more thorough sterilization, but this is generally not necessary for oyster mushrooms. Ensure the substrate cools down completely before adding the mushroom spawn.
How long does it take for mushrooms to grow in recycled cans?
The time it takes for mushrooms to grow depends on the variety, the environmental conditions, and the quality of the spawn. Oyster mushrooms typically start pinning (forming small mushroom buds) within 1-2 weeks and are ready to harvest within 3-5 days after pinning. Shiitake mushrooms can take several weeks or even months to fruit. Maintain consistent moisture and temperature to encourage faster growth.
What is the ideal temperature and humidity for growing mushrooms in recycled cans?
Most mushroom varieties thrive in temperatures between 60-75°F (15-24°C). Humidity is also crucial, especially during the pinning stage. Aim for a humidity level of 80-90%. You can increase humidity by misting the cans regularly with water or by placing them in a humidity tent or greenhouse.
How often should I water the mushroom growing cans?
Watering frequency depends on the humidity and temperature of your environment. Check the substrate regularly and mist it with water whenever it feels dry to the touch. Avoid overwatering, as this can lead to mold growth. The goal is to keep the substrate consistently moist but not soggy.
What if I see mold growing in my mushroom growing can?
Mold is a common problem in mushroom cultivation. If you see mold, try to identify the type of mold. Some molds are harmless, while others can be detrimental to your mushroom crop. If the mold is localized, you can try to remove it with a clean spoon or knife. If the mold is widespread, it’s best to discard the entire can and start over with fresh substrate and spawn.
Can I reuse the substrate after harvesting mushrooms?
Yes, you can often get multiple flushes (harvests) from the same substrate. After harvesting, allow the substrate to rest for a week or two, then rehydrate it by soaking it in water for a few hours. This will encourage another flush of mushrooms. However, the yield of subsequent flushes may be lower than the first. Eventually, the substrate will become depleted of nutrients and will need to be replaced.
Where should I place my recycled can mushroom farms?
Choose a location that is cool, dark, and humid. A basement, garage, or closet are all good options. Avoid direct sunlight, as this can dry out the substrate and inhibit mushroom growth. You can also place the cans in a shaded outdoor area, but be sure to protect them from rain and extreme temperatures.
How do I know when the mushrooms are ready to harvest?
Mushrooms are typically ready to harvest when the caps are fully formed but still slightly curled downwards. The gills should be visible but not yet releasing spores. Gently twist or cut the mushrooms off at the base of the stem.
Is it safe to eat mushrooms grown in recycled cans?
Yes, it is generally safe to eat mushrooms grown in recycled cans, as long as you follow proper hygiene and sterilization procedures. Be sure to thoroughly clean the cans before use and sterilize the substrate to prevent contamination. Only consume mushrooms that you are certain are edible. If you are unsure about the identity of a mushroom, do not eat it.
Leave a Comment