

Olive oil wood polish: sounds too good to be true, right? I thought so too, until I tried it! For generations, our grandmothers whispered about using simple, natural ingredients to keep their homes sparkling. Before the age of mass-produced furniture polish, olive oil was a staple in many households, not just for cooking, but for bringing out the natural luster of wood.
Think about it – wood furniture is an investment, and keeping it looking its best can feel like a constant battle against dust, scratches, and dullness. Store-bought polishes can be expensive and often contain harsh chemicals that I’m not always comfortable using around my family and pets. That’s where this amazing DIY olive oil wood polish comes in! It’s a cost-effective, eco-friendly, and surprisingly effective way to revive your wooden surfaces.
In this article, I’m going to share my tried-and-true recipe for a simple olive oil wood polish that will leave your furniture gleaming. I’ll also walk you through the application process, share some helpful tips and tricks, and answer some common questions. Get ready to ditch those chemical-laden sprays and embrace the natural power of olive oil!
DIY Olive Oil Wood Polish: Revive Your Furniture with Natural Shine
Hey there, fellow DIY enthusiasts! Are your wooden furniture pieces looking a little dull and lifeless? Don’t rush out to buy expensive commercial polishes just yet! I’m going to show you how to create a fantastic, all-natural wood polish using something you probably already have in your kitchen: olive oil! This simple DIY project is not only cost-effective but also environmentally friendly, and it will leave your furniture looking refreshed and beautiful.
What You’ll Need
Before we get started, let’s gather our supplies. This is a super simple recipe, so you won’t need much:
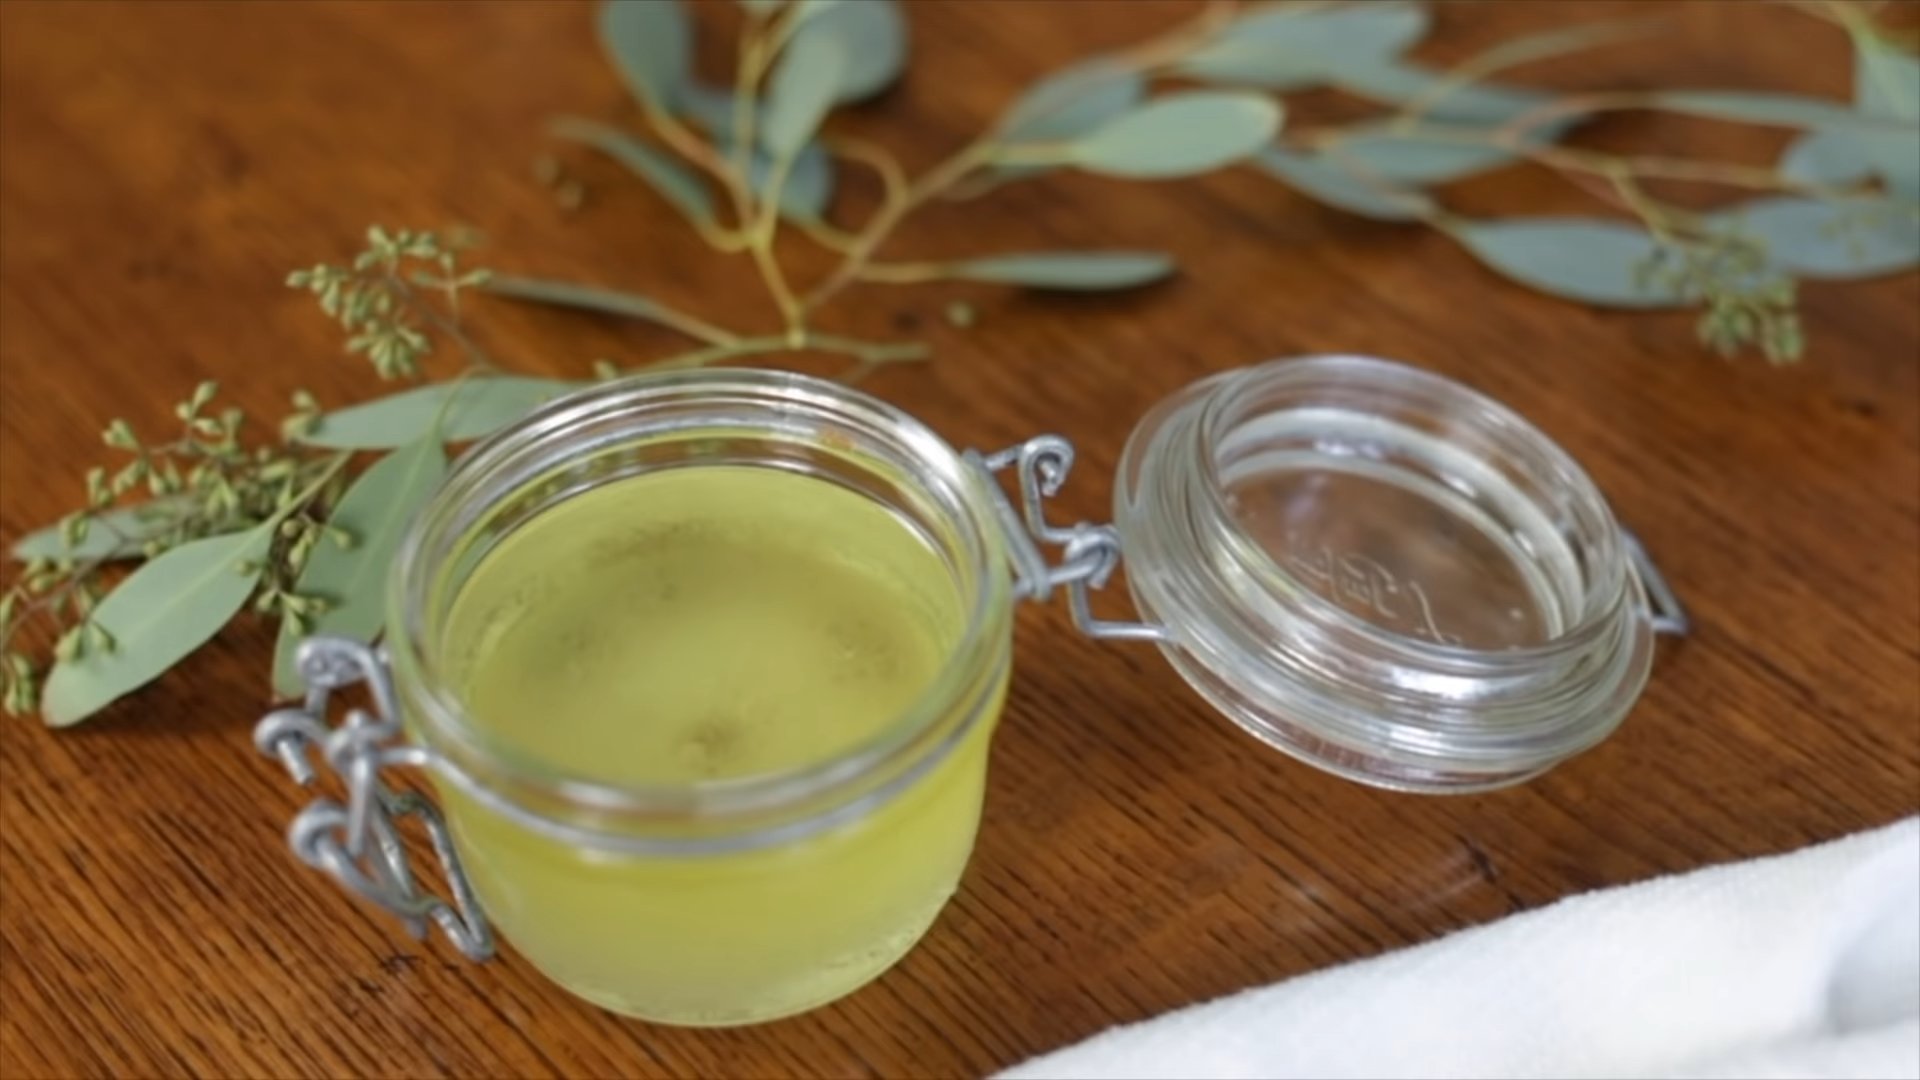
* Olive Oil: Extra virgin olive oil is great, but regular olive oil works just fine too.
* Lemon Juice (or White Vinegar): This helps cut through any grime and adds a nice shine.
* Soft Cloths: You’ll need at least two – one for applying the polish and one for buffing. Microfiber cloths are ideal.
* Spray Bottle (Optional): This can make application easier, but it’s not essential.
* Bowl or Small Container: For mixing the polish.
The Recipe: Getting the Ratios Right
The key to a good olive oil wood polish is getting the proportions right. Too much oil, and your furniture will feel greasy. Too much lemon juice (or vinegar), and it might be too acidic. Here’s my go-to recipe:
* 2 parts Olive Oil
* 1 part Lemon Juice (or White Vinegar)
For example, you could use 1/2 cup of olive oil and 1/4 cup of lemon juice. Adjust the amounts based on how much polish you need. I usually start with a small batch and make more if necessary.
Step-by-Step Instructions: Polishing Like a Pro
Now for the fun part! Let’s get polishing!
1. Prepare Your Furniture: Before you even think about applying the polish, make sure your furniture is clean. Dust it thoroughly with a dry cloth or a vacuum cleaner with a brush attachment. You want to remove any loose dirt or debris that could scratch the surface during polishing.
2. Mix the Polish: In your bowl or small container, combine the olive oil and lemon juice (or vinegar). Stir well to ensure they are properly mixed. If you’re using a spray bottle, you can pour the mixture directly into it.
3. Test in an Inconspicuous Area: This is crucial! Before applying the polish to the entire piece of furniture, test it on a small, hidden area, like the back of a leg or the underside of a table. This will allow you to see how the polish reacts with the wood and ensure it doesn’t cause any discoloration or damage. Let it sit for a few minutes, then wipe it off with a clean cloth. If everything looks good, you can proceed.
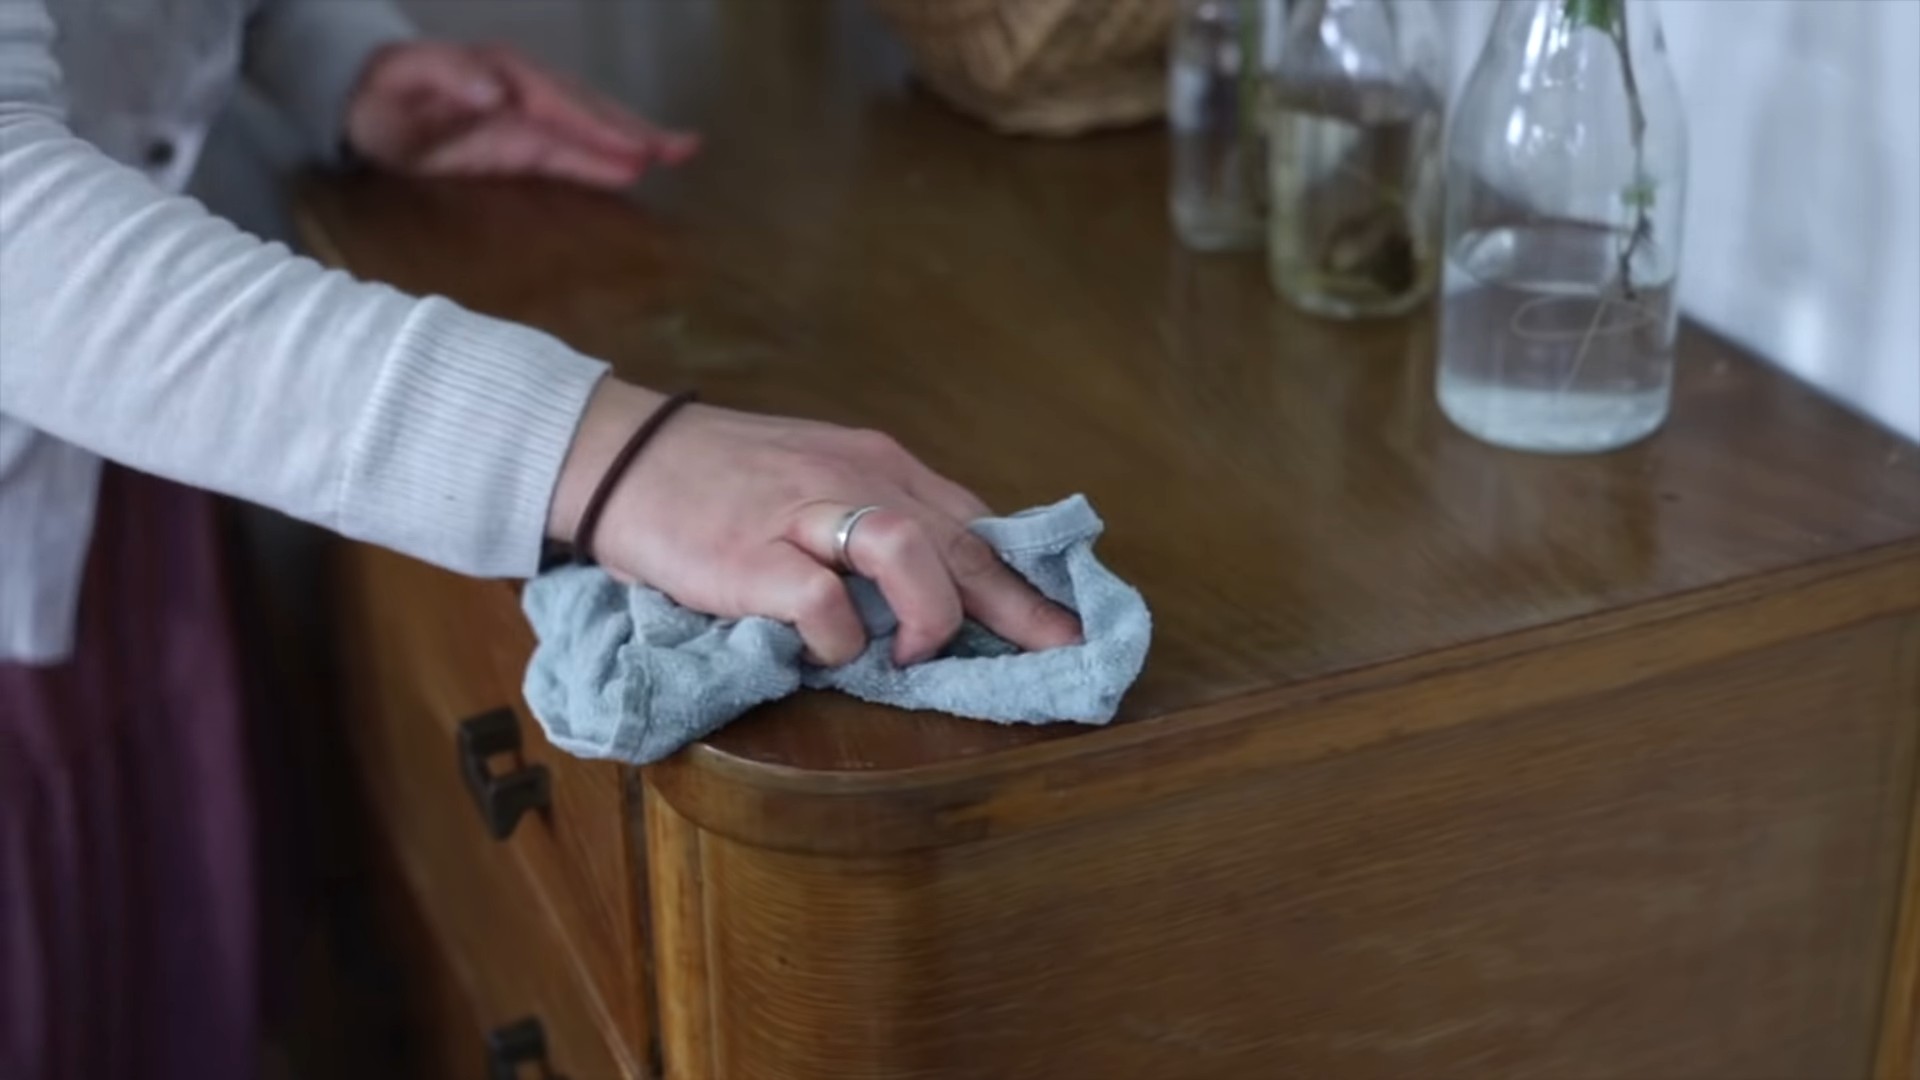
4. Apply the Polish: Now, using your soft cloth, apply a small amount of the olive oil polish to the wood surface. If you’re using a spray bottle, lightly mist the surface. Don’t overdo it! A little goes a long way. Work in small sections, applying the polish in a circular motion.
5. Let it Sit (Briefly): Allow the polish to sit on the wood for a few minutes (around 5-10 minutes). This gives the oil time to penetrate the wood and moisturize it.
6. Buff, Buff, Buff!: This is where the magic happens! Using a clean, dry cloth, buff the surface of the furniture in a circular motion. This will remove any excess polish and bring out the natural shine of the wood. Be sure to buff thoroughly to avoid any sticky residue. You might need to buff several times to achieve the desired shine.
7. Admire Your Work: Step back and admire your beautifully polished furniture! You’ll be amazed at how much of a difference a little olive oil can make.
Troubleshooting and Tips for Success
Even with a simple DIY project like this, you might encounter a few hiccups. Here are some tips to help you avoid common problems:
* Greasy Residue: If your furniture feels greasy after polishing, you’ve probably used too much oil. Simply buff the surface again with a clean, dry cloth until the greasiness is gone.
* Dull Finish: If your furniture doesn’t seem to be shining, make sure you’re buffing thoroughly. You might also need to add a little more lemon juice (or vinegar) to your polish mixture.
* Discoloration: If you notice any discoloration after testing the polish, stop using it immediately. The wood might be reacting to the lemon juice (or vinegar). Try using a different type of oil, like mineral oil, or consult with a professional furniture restorer.
* Frequency of Polishing: How often you need to polish your furniture depends on how often it’s used and exposed to the elements. Generally, polishing every few months is sufficient.
* Type of Wood: This olive oil polish works well on most types of wood, but it’s always a good idea to test it in an inconspicuous area first. Avoid using it on unfinished wood, as it may absorb too much oil.
* Smell: If you don’t like the smell of olive oil, you can add a few drops of essential oil to your polish mixture. Lavender, lemon, or orange essential oils work well.
Cleaning Your Polishing Cloths
Don’t just toss those cloths in the trash! You can easily clean them and reuse them for future polishing projects.
1. Rinse: Immediately after using the cloths, rinse them thoroughly with warm water to remove any excess polish.
2. Wash: Wash the cloths in your washing machine with a mild detergent. Avoid using fabric softener, as it can leave a residue on the cloths.
3. Dry: Tumble dry the cloths on low heat or hang them to dry.
Alternative Ingredients and Variations
While olive oil and lemon juice (or vinegar) are the main ingredients in this DIY wood polish, you can experiment with other ingredients to customize it to your liking.
* Beeswax: Adding a small amount of melted beeswax to the polish will create a harder, more durable finish. Melt the beeswax in a double boiler or microwave before adding it to the olive oil and lemon juice.
* Essential Oils: As mentioned earlier, you can add a few drops of essential oil to your polish for a pleasant scent.
* Vinegar vs. Lemon Juice: Both vinegar and lemon juice work well in this polish, but vinegar is slightly more acidic and may be better for removing stubborn grime. Lemon juice, on the other hand, has a more pleasant scent.
* Mineral Oil: If you’re concerned about the acidity of lemon juice or vinegar, you can substitute mineral oil for olive oil. Mineral oil is a non-drying oil that won’t go rancid.
Safety Precautions
While this DIY wood polish is made with natural ingredients, it’s still important to take a few safety precautions:
* Ventilation: Work in a well-ventilated area to avoid inhaling any fumes.
* Skin Sensitivity: If you have sensitive skin, wear gloves when handling the polish.
* Eye Contact: Avoid getting the polish in your eyes. If you do, rinse them thoroughly with water.
* Storage: Store the polish in a cool, dry place away from children and pets.
Why DIY Wood Polish?
You might be wondering why you should bother making your own wood polish when you can easily buy it at the store. Here are a few compelling reasons:
* Cost-Effective: DIY wood polish is significantly cheaper than commercial polishes.
* Natural Ingredients: You know exactly what’s going into your polish, so you can avoid harsh chemicals and synthetic fragrances.
* Environmentally Friendly: By using natural ingredients, you’re reducing your environmental impact.
* Customizable: You can customize the polish to your liking by adding essential oils or other ingredients.
* Satisfaction: There’s something incredibly satisfying about making your own cleaning products.
So, there you have it! A simple, effective, and all-natural DIY olive oil wood polish that will leave your furniture looking its best. Give it a try, and let me know what you think! Happy polishing!
Conclusion
So, there you have it! Transforming your dull, lifeless wooden furniture into gleaming, revitalized pieces is easier and more affordable than you ever imagined. This DIY olive oil wood polish isn’t just a cost-effective alternative to store-bought products; it’s a natural, gentle way to nourish and protect your wood, bringing out its inherent beauty.
Why is this a must-try? Because it’s simple, effective, and uses ingredients you likely already have in your pantry. Forget about harsh chemicals and overpowering artificial scents. This method relies on the power of nature to restore your furniture’s luster and extend its lifespan. The olive oil penetrates the wood, moisturizing it from within and preventing it from drying out and cracking. The lemon juice, or vinegar, acts as a mild cleaner, cutting through grime and leaving a fresh, clean scent.
But the benefits extend beyond just aesthetics. By choosing this DIY approach, you’re also making a conscious decision to reduce your environmental impact. You’re avoiding the plastic packaging and potentially harmful chemicals found in commercial polishes, opting instead for a sustainable and eco-friendly solution.
Looking for variations? Absolutely! For a deeper conditioning treatment, consider adding a few drops of essential oils like cedarwood or sandalwood. These oils not only enhance the scent but also offer additional protective properties for your wood. If you’re dealing with particularly stubborn stains or buildup, you can increase the proportion of lemon juice or vinegar slightly, but always test on an inconspicuous area first. For lighter woods, you might want to skip the lemon juice altogether to avoid any potential lightening effects. A touch of beeswax, melted and added to the mixture, will provide an extra layer of protection and a beautiful sheen. Remember to always test any variation on a small, hidden area of your furniture before applying it to the entire piece.
We’re confident that once you try this DIY olive oil wood polish, you’ll be amazed by the results. It’s a simple, rewarding project that will leave your furniture looking its best. Don’t just take our word for it – give it a try! We encourage you to experiment with the variations and find the perfect formula for your specific wood type and preferences.
And most importantly, we want to hear about your experience! Share your before-and-after photos, your tips and tricks, and any variations you’ve discovered in the comments below. Let’s build a community of DIY enthusiasts who are passionate about restoring and preserving the beauty of wood furniture using natural and sustainable methods. Your feedback will not only help other readers but also inspire us to continue exploring and sharing innovative DIY solutions. So, grab your olive oil, a soft cloth, and get ready to transform your furniture! We can’t wait to see your results!
Frequently Asked Questions (FAQ)
What kind of olive oil should I use for this DIY wood polish?
Ideally, you should use extra virgin olive oil. It’s the purest form of olive oil and contains the most beneficial properties for nourishing wood. However, regular olive oil will also work in a pinch. Avoid using flavored olive oils, as the added ingredients could potentially damage or discolor your furniture. The key is to use a good quality olive oil that is free from additives.
How often should I use this olive oil wood polish?
The frequency of polishing depends on the type of wood, the environment, and how often the furniture is used. Generally, polishing every one to three months is sufficient for most furniture. If your furniture is exposed to direct sunlight or dry air, you may need to polish it more frequently. Observe your furniture for signs of dryness or dullness, and polish it accordingly. Over-polishing can lead to a buildup of oil, so it’s best to err on the side of caution.
Can I use this olive oil wood polish on all types of wood?
This DIY wood polish is generally safe for most types of finished wood, including hardwoods like oak, maple, and cherry, as well as softwoods like pine. However, it’s always best to test it on an inconspicuous area first, especially if you’re unsure about the type of wood or the finish. Avoid using this polish on unfinished wood, as the oil can penetrate too deeply and cause staining. Also, be cautious when using it on antique furniture, as some finishes may be delicate and require specialized care.
What if I don’t have lemon juice? Can I use something else?
Yes, you can substitute lemon juice with white vinegar. White vinegar is another mild acid that can help to clean and brighten wood. Use the same amount of vinegar as you would lemon juice. Some people prefer vinegar because it’s readily available and has a slightly stronger cleaning action. However, be mindful of the smell of vinegar, which can be quite pungent. It will dissipate quickly, but if you’re sensitive to odors, you may prefer lemon juice.
My furniture has a lot of buildup. Will this olive oil wood polish be effective?
This DIY polish can help to remove some buildup, but for heavy buildup, you may need to pre-clean the furniture first. You can use a mild soap and water solution to gently clean the surface before applying the polish. Make sure to dry the furniture thoroughly before polishing. For stubborn buildup, you might consider using a specialized wood cleaner, but always follow the manufacturer’s instructions and test it on an inconspicuous area first. After cleaning, the olive oil wood polish will help to restore the wood’s luster and protect it from future buildup.
How do I store the leftover olive oil wood polish?
Store any leftover polish in an airtight container in a cool, dark place. A glass jar is ideal. The polish should last for several weeks. Before each use, give the container a good shake to ensure the ingredients are properly mixed. If you notice any separation or changes in color or odor, discard the polish. It’s best to make small batches of polish as needed to ensure freshness and effectiveness.
The polish seems to be leaving a greasy residue. What am I doing wrong?
A greasy residue usually indicates that you’re using too much polish. Apply the polish sparingly, and buff the furniture thoroughly with a clean, dry cloth. You may need to buff it several times to remove any excess oil. Another possible cause is that the cloth you’re using is not absorbent enough. Use a soft, lint-free cloth, such as microfiber, to ensure that the polish is evenly distributed and that any excess is effectively removed.
Can I use this polish on my wood floors?
While this polish is effective for furniture, it’s not recommended for wood floors. Wood floors require specialized cleaning and polishing products that are designed to protect the finish and prevent slippage. Using olive oil on wood floors can make them slippery and attract dirt and dust. It’s best to use a wood floor cleaner and polish specifically formulated for your type of flooring.
Is there anything else I can add to the polish for extra protection?
Yes, as mentioned earlier, you can add a small amount of melted beeswax to the polish for extra protection and a beautiful sheen. Melt the beeswax using a double boiler or microwave, and then add it to the olive oil and lemon juice mixture. Stir well to combine. The beeswax will create a protective layer on the wood, helping to repel water and prevent scratches. Be sure to use a small amount of beeswax, as too much can make the polish difficult to apply and buff.
What if my furniture has a very delicate or antique finish?
If you have furniture with a very delicate or antique finish, it’s best to consult with a professional furniture restorer before using any DIY polish. Antique finishes can be easily damaged by improper cleaning or polishing techniques. A professional can assess the condition of the finish and recommend the appropriate cleaning and polishing methods. They may also be able to provide valuable advice on how to care for your antique furniture to preserve its value and beauty.


Leave a Comment