

Propagate grapes with water – sounds like magic, doesn’t it? I remember my grandmother, a true green thumb, always saying, “The simplest solutions are often the best.” And when it comes to expanding your vineyard without breaking the bank, she couldn’t be more right! For centuries, grape cultivation has been a cornerstone of cultures around the world, from ancient Roman vineyards to the sun-drenched slopes of Napa Valley. The ability to easily multiply these vines was crucial for both sustenance and trade.
But let’s be honest, traditional methods of grape propagation can be intimidating, involving complex grafting techniques and specialized equipment. That’s where this DIY trick comes in! Imagine effortlessly creating new grapevines from simple cuttings, using nothing more than water and a little patience. No more expensive nursery trips or complicated procedures.
This method is perfect for anyone who wants to expand their existing grape collection, share cuttings with friends, or simply experience the joy of nurturing new life. I’m going to show you how to propagate grapes with water, a surprisingly easy and effective technique that will have you growing your own grapes in no time. Get ready to unlock the secrets to a thriving home vineyard!
Propagating Grape Vines with Water: A Simple DIY Guide
Hey there, fellow gardening enthusiasts! Ever wished you could multiply your grape vines without spending a fortune on new plants? Well, you’re in luck! Propagating grape vines using just water is a surprisingly easy and rewarding DIY project. I’ve done it myself countless times, and I’m excited to share my tried-and-true method with you. Get ready to expand your vineyard (even if it’s just a small one in your backyard!).
What You’ll Need
Before we dive in, let’s gather our supplies. The beauty of this method is that it requires minimal tools and materials. Here’s what you’ll need:
* Healthy Grape Vine Cuttings: This is the most crucial element. Choose cuttings from a healthy, disease-free grape vine. Look for stems that are about the thickness of a pencil and have several nodes (the points where leaves or buds grow).
* Sharp Pruning Shears or Knife: A clean, sharp cutting tool is essential for making precise cuts and preventing disease.
* Clean Glass Jars or Containers: You’ll need containers to hold the water and the cuttings. Mason jars, recycled glass jars, or even plastic cups will work just fine. Just make sure they’re clean!
* Water: Tap water is generally fine, but you can also use filtered or distilled water if you prefer.
* Rooting Hormone (Optional): While not strictly necessary, rooting hormone can significantly increase your success rate. I highly recommend using it, especially if you’re new to propagation.
* Small Pots or Containers with Potting Mix: Once your cuttings have developed roots, you’ll need to transplant them into pots. Use a well-draining potting mix specifically formulated for seedlings or cuttings.
* Spray Bottle (Optional): A spray bottle can be helpful for misting the cuttings to keep them hydrated.
* Labels and a Permanent Marker: Trust me, you’ll want to label your cuttings, especially if you’re propagating multiple varieties.
Choosing the Right Cuttings
Selecting the right cuttings is paramount for successful propagation. Here’s what I look for:
* Dormant Cuttings: The best time to take cuttings is during the dormant season, typically in late winter or early spring before the buds begin to swell. This is when the vine’s energy is concentrated in the stems.
* Healthy Wood: Choose stems that are firm, healthy, and free from any signs of disease or damage. Avoid cuttings that are thin, weak, or discolored.
* Proper Length: Aim for cuttings that are about 6-12 inches long. This provides enough stem for root development and allows you to bury a portion of the cutting in the potting mix later on.
* Number of Nodes: Each cutting should have at least 3-4 nodes. These are the points where roots will emerge.
Taking the Cuttings
Now, let’s get to the fun part – taking the cuttings!
1. Gather Your Materials: Make sure you have your pruning shears, grape vine, and a clean container to collect the cuttings.
2. Select a Healthy Stem: Choose a healthy, dormant stem that meets the criteria outlined above.
3. Make the Cuts: Using your sharp pruning shears, make a clean, angled cut just below a node at the bottom of the cutting. This will help the cutting absorb water more easily. At the top of the cutting, make a straight cut about an inch above a node.
4. Remove Excess Leaves: If there are any leaves or tendrils on the cutting, remove them carefully. This will prevent the cutting from losing too much moisture.
5. Repeat: Repeat steps 2-4 to collect as many cuttings as you need. I usually take a few extra cuttings to account for potential failures.
Preparing the Cuttings for Rooting
Before we put the cuttings in water, let’s prepare them for optimal root development.
1. Apply Rooting Hormone (Optional): If you’re using rooting hormone, dip the bottom inch of each cutting into the powder or liquid. This will stimulate root growth and increase your chances of success. Follow the instructions on the rooting hormone packaging.
2. Prepare Your Water Containers: Fill your clean glass jars or containers with fresh water.
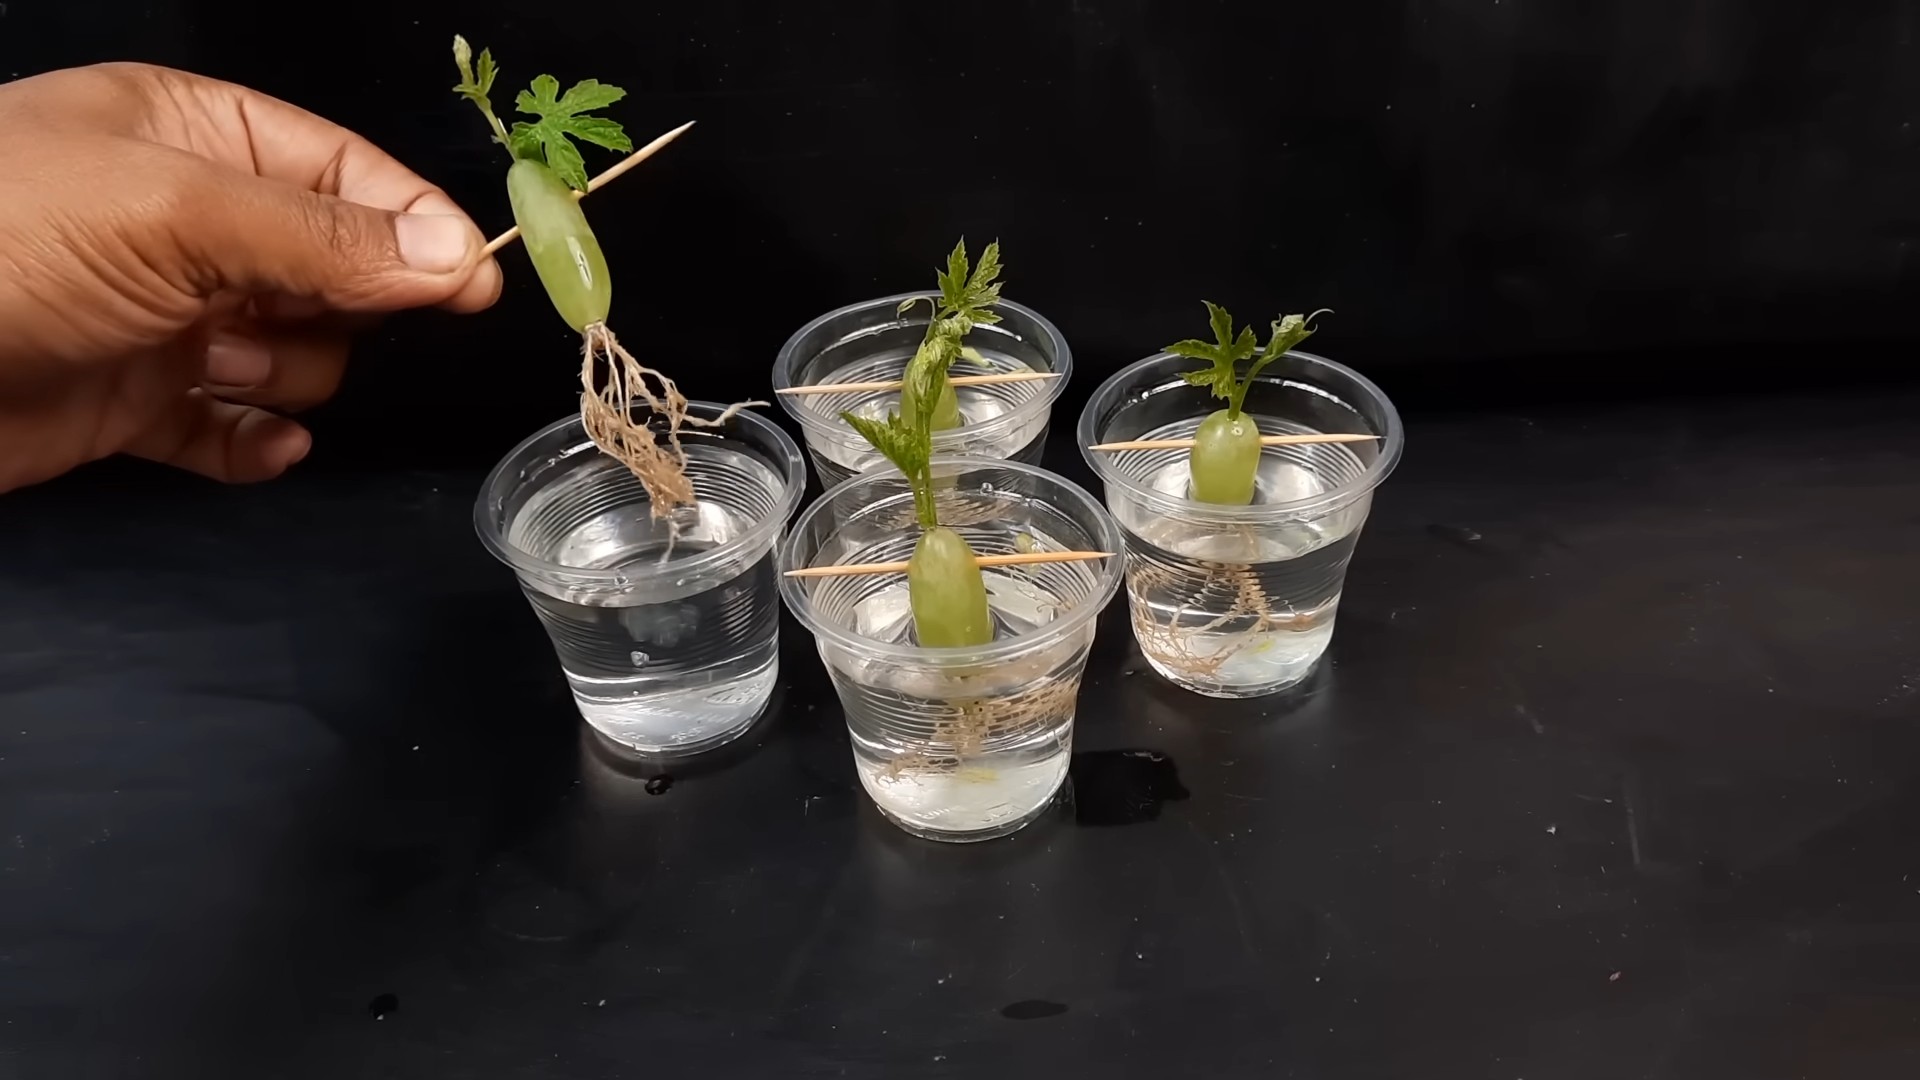
3. Place the Cuttings in Water: Place the cuttings in the water, ensuring that the bottom nodes are submerged. Don’t overcrowd the containers; give each cutting enough space to breathe.
The Rooting Process
This is where the magic happens! Now, we just need to provide the right environment for the cuttings to develop roots.
1. Choose a Location: Place the containers in a warm, bright location, but avoid direct sunlight. A windowsill or a spot near a grow light is ideal.
2. Change the Water Regularly: Change the water every 2-3 days to prevent the growth of algae and bacteria. This will also ensure that the cuttings have access to fresh oxygen.
3. Monitor Root Development: Keep a close eye on the cuttings for signs of root development. You should start to see small roots emerging from the nodes within a few weeks.
4. Mist the Cuttings (Optional): If the air is dry, you can mist the cuttings with water every day to keep them hydrated.
5. Be Patient: Rooting can take several weeks, so be patient and don’t give up!
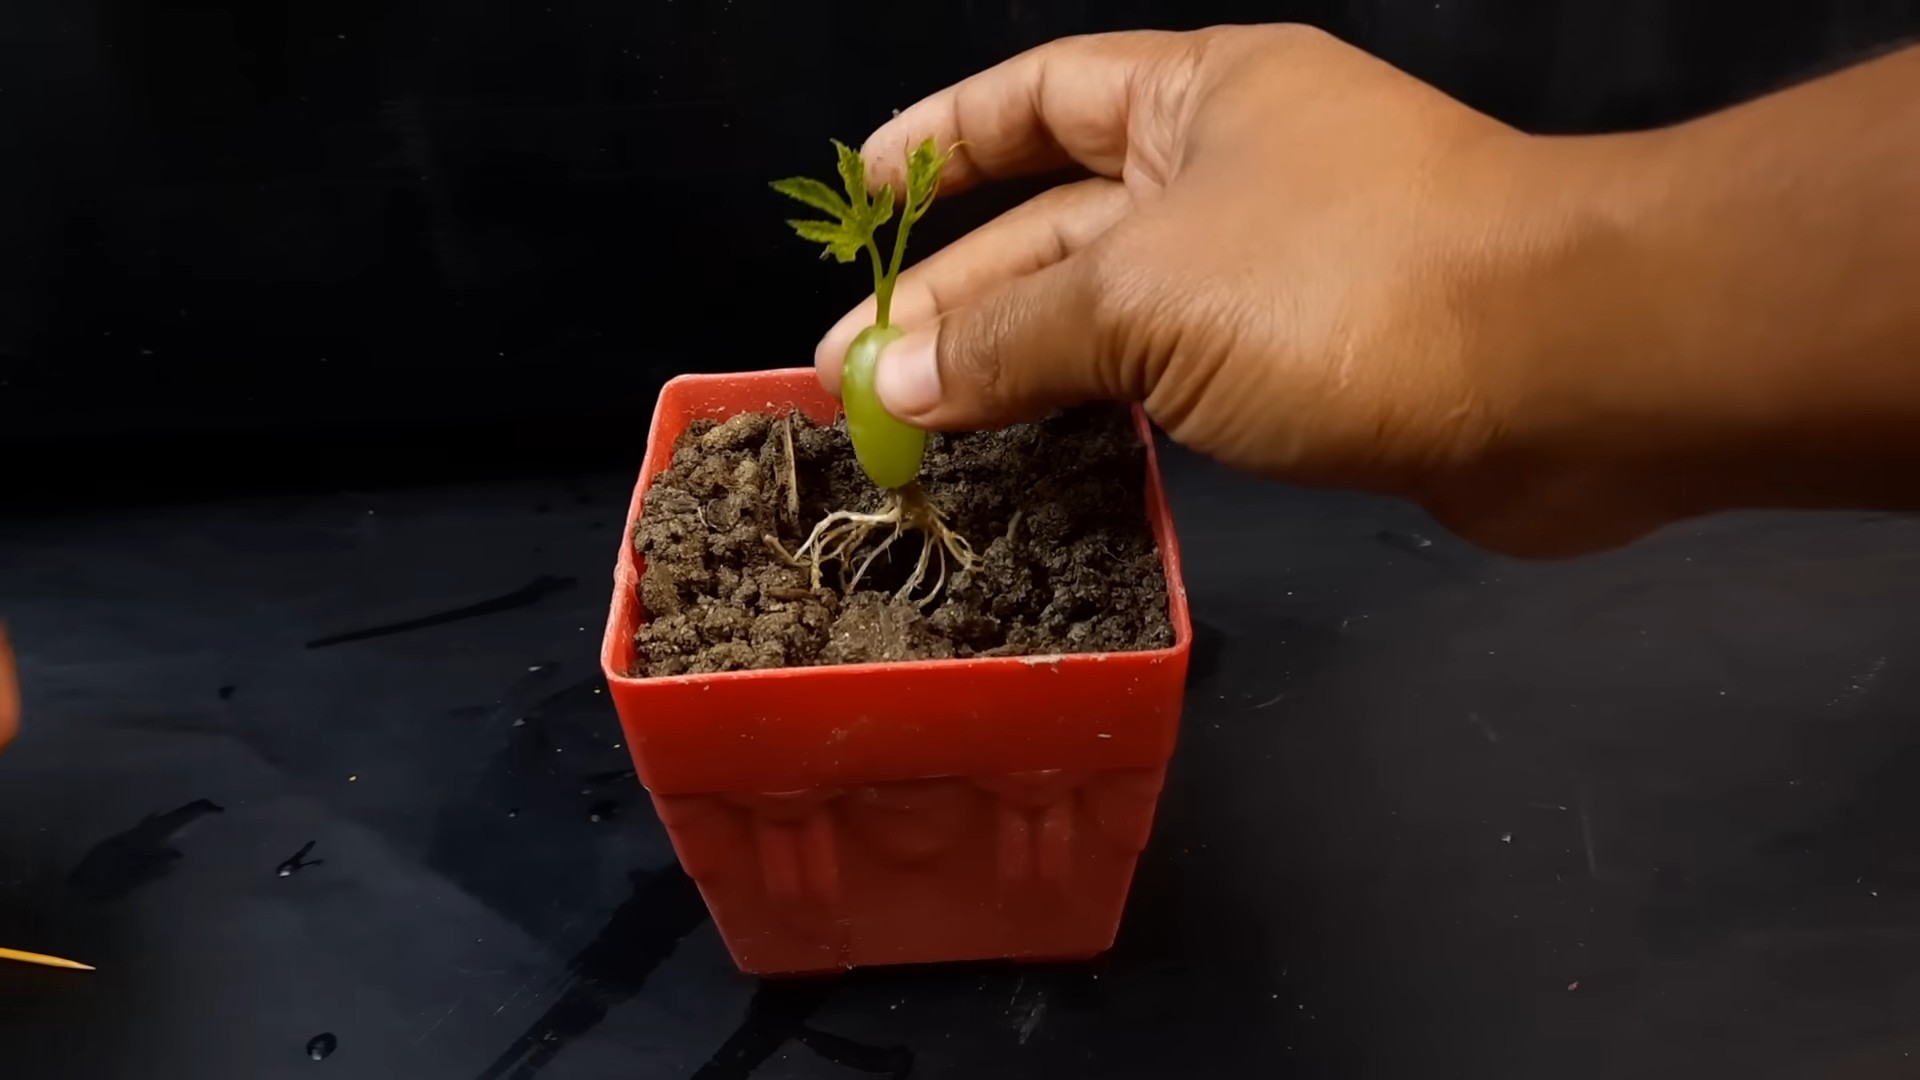
Transplanting the Rooted Cuttings
Once the cuttings have developed a healthy root system (about 1-2 inches long), it’s time to transplant them into pots.
1. Prepare Your Pots: Fill small pots or containers with a well-draining potting mix.
2. Carefully Remove the Cuttings: Gently remove the rooted cuttings from the water, being careful not to damage the delicate roots.
3. Plant the Cuttings: Make a small hole in the potting mix and carefully plant the cutting, ensuring that the roots are covered.
4. Water Thoroughly: Water the newly planted cuttings thoroughly to settle the soil.
5. Provide Support (Optional): If the cuttings are tall and spindly, you can provide support with a small stake or trellis.
Caring for Your New Grape Vines
Now that your grape vines are planted, it’s important to provide them with the proper care to ensure their survival and growth.
1. Water Regularly: Keep the soil consistently moist, but not waterlogged. Water when the top inch of soil feels dry to the touch.
2. Provide Sunlight: Place the pots in a sunny location where they will receive at least 6-8 hours of sunlight per day.
3. Fertilize Sparingly: Fertilize the grape vines sparingly with a balanced fertilizer. Follow the instructions on the fertilizer packaging.
4. Protect from Frost: If you live in an area with cold winters, protect the grape vines from frost by bringing them indoors or covering them with a blanket.
5. Prune Regularly: Prune the grape vines regularly to encourage healthy growth and fruit production.
Troubleshooting Tips
Even with the best care, you may encounter some challenges during the propagation process. Here are a few troubleshooting tips to help you overcome common problems:
* Cuttings Rotting: If your cuttings are rotting, it could be due to poor water quality or overcrowding. Change the water more frequently and ensure that the cuttings have enough space.
* No Root Development: If your cuttings are not developing roots, it could be due to a lack of sunlight, improper temperature, or insufficient humidity. Try moving the cuttings to a brighter location, increasing the temperature, or misting them more frequently.
* Fungal Growth: If you notice fungal growth on the cuttings, it could be due to poor ventilation or excessive moisture. Improve ventilation by opening a window or using a fan. You can also try spraying the cuttings with a fungicide.
* Wilting Cuttings: If your cuttings are wilting, it could be due to a lack of water or excessive heat. Water the cuttings more frequently and move them to a cooler location.
Additional Tips for Success
Here are a few extra tips that I’ve learned over the years that can help you increase your success rate:
* Use Rainwater: If possible, use rainwater instead of tap water. Rainwater is naturally soft and contains beneficial nutrients that can promote root growth.
* Add a Drop of Honey: Some gardeners swear by adding a drop of honey to the water. Honey is a natural antiseptic and can help prevent fungal growth.
* Experiment with Different Varieties: Not all grape varieties are created equal. Some varieties are easier to propagate than others. Experiment with different varieties to see which ones work best for you.
* Keep a Journal: Keep a journal to track your progress and record any observations. This will help you learn from your mistakes and improve your technique over
Conclusion
So, there you have it! Propagating grapes with water is not just a cost-effective way to expand your vineyard (even if that vineyard is just a few pots on your balcony!), it’s also an incredibly rewarding experience. Witnessing those tiny roots emerge from a simple cutting is a testament to the resilience of nature and the power you hold as a gardener.
Why is this DIY trick a must-try? Because it’s simple, accessible, and yields impressive results. Forget expensive equipment or complicated techniques. All you need is water, a jar, and a little patience. Plus, think of the satisfaction of knowing you nurtured a new grape vine from a single cutting! You’re essentially creating something from almost nothing, and that’s a pretty amazing feeling.
But the fun doesn’t stop there! Feel free to experiment with different grape varieties. Try propagating cuttings from your favorite table grapes or even those unique wine grapes you’ve always admired. You can also play around with the rooting environment. While water propagation is highly effective, some gardeners have success with adding a rooting hormone to the water or using a diluted nutrient solution to give the cuttings an extra boost. Consider using different types of water, such as rainwater or distilled water, to see if it impacts the rooting process.
Another variation to consider is the timing of your cuttings. While late winter or early spring is generally recommended, you might find success at other times of the year depending on your climate and the specific grape variety. Keep a journal of your experiments, noting the date, variety, and any special techniques you used. This will help you refine your propagation skills and become a true grape-growing guru!
We wholeheartedly encourage you to give this DIY grape propagation method a try. It’s a fantastic project for both beginner and experienced gardeners alike. Not only will you expand your grape collection, but you’ll also gain a deeper appreciation for the plant life around you.
And most importantly, don’t forget to share your experiences! We’d love to hear about your successes (and even your challenges) in the comments below. What grape varieties did you propagate? Did you try any variations on the technique? What tips and tricks did you discover along the way? Your insights could help other gardeners embark on their own grape-growing adventures. Let’s build a community of grape propagators and share the joy of growing these delicious and versatile fruits! So, grab your pruning shears, fill up a jar with water, and get ready to witness the magic of grape propagation! You’ll be amazed at how easy it is to create new grape vines using this simple and effective method. Happy growing!
Frequently Asked Questions (FAQ)
What is the best time of year to propagate grapes with water?
The ideal time to propagate grapes with water is during late winter or early spring, before the grape vine begins its active growth phase. This is when the cuttings are dormant and have the highest chance of successfully rooting. Avoid taking cuttings during the heat of summer or when the vine is actively fruiting.
What type of grape cuttings should I use?
Use hardwood cuttings, which are sections of mature, dormant stems that are about pencil-thick. These cuttings should be taken from healthy, disease-free vines. Look for cuttings with at least three to four nodes (the points where leaves or buds emerge). Avoid using thin, weak, or damaged cuttings.
How long does it take for grape cuttings to root in water?
The time it takes for grape cuttings to root in water can vary depending on several factors, including the grape variety, the temperature, and the quality of the water. Generally, you can expect to see roots emerge within two to six weeks. Be patient and change the water regularly to prevent the growth of algae or bacteria.
What kind of water should I use for grape propagation?
It’s best to use clean, non-chlorinated water for grape propagation. Tap water can sometimes contain chemicals that inhibit root growth. Consider using distilled water, rainwater, or filtered water. Change the water every few days to keep it fresh and oxygenated.
How do I prevent the cuttings from rotting in the water?
To prevent the cuttings from rotting, it’s important to use clean water and change it regularly. Also, make sure that only the bottom portion of the cutting is submerged in water. Avoid overcrowding the cuttings in the jar, as this can increase the risk of fungal or bacterial growth. If you notice any signs of rot, such as discoloration or a foul odor, remove the affected cutting immediately.
What do I do after the grape cuttings have rooted?
Once the grape cuttings have developed a good root system (at least a few inches long), they are ready to be transplanted into pots filled with well-draining potting mix. Be gentle when handling the delicate roots. Water the newly potted cuttings thoroughly and keep the soil consistently moist but not waterlogged. Gradually acclimate the young plants to outdoor conditions before transplanting them into their permanent location.
Can I use rooting hormone to propagate grapes with water?
While not strictly necessary, using a rooting hormone can sometimes improve the success rate of grape propagation. Rooting hormones contain auxins, which are plant hormones that stimulate root growth. If you choose to use a rooting hormone, follow the instructions on the product label. You can either dip the base of the cutting in the hormone powder or dissolve the hormone in the water.
What kind of soil should I use for planting the rooted grape cuttings?
Use a well-draining potting mix that is rich in organic matter. A mixture of equal parts potting soil, perlite, and compost is a good option. Avoid using heavy clay soils, as they can retain too much moisture and lead to root rot.
How much sunlight do the rooted grape cuttings need?
Newly rooted grape cuttings need bright, indirect sunlight. Avoid exposing them to direct sunlight, as this can scorch the delicate leaves. Once the plants have established themselves, they can tolerate more direct sunlight. Grape vines generally need at least six to eight hours of sunlight per day to thrive.
What are some common problems when propagating grapes with water?
Some common problems when propagating grapes with water include:
* **Rotting:** This can be caused by using contaminated water or overcrowding the cuttings.
* **Lack of root development:** This can be due to using poor-quality cuttings, improper water conditions, or insufficient sunlight.
* **Fungal or bacterial infections:** These can be prevented by using clean water and avoiding overcrowding.
* **Failure to thrive after transplanting:** This can be caused by improper soil conditions, insufficient sunlight, or inadequate watering.
By following the tips and techniques outlined in this article, you can minimize these problems and increase your chances of successfully propagating grapes with water. Remember, patience and persistence are key!

Leave a Comment